Every SuperTrend flip graded by five checks, with the entry, the stop and three targets already on the chart.
SuperTrend Sentinel Levels prints an arrow when the SuperTrend flips and the close clears its buffer zone, then counts how many of five checks agree: the 100 EMA, RSI, ADX, volume and the higher-timeframe SuperTrend. That count decides which arrows reach you as alerts, so a flip with nothing behind it stays quiet. The entry, a stop 2.5 ATRs away and three targets are drawn when the bar closes, with the day's VWAP, a Fibonacci golden zone, Heikin-Ashi bar colours and an 18-row dashboard on the same chart. One purchase includes both the .ex4 and the .ex5.
- Decided on closed bars. With Wait for Bar Close on, the default, an arrow stays where it printed.
- You set how strict. Filter Mode decides how many checks an alert needs. Every arrow stays on the chart, so you can see what was filtered and why.
- MetaTrader 4 and 5 builds and a PDF manual for each, one-time $47.
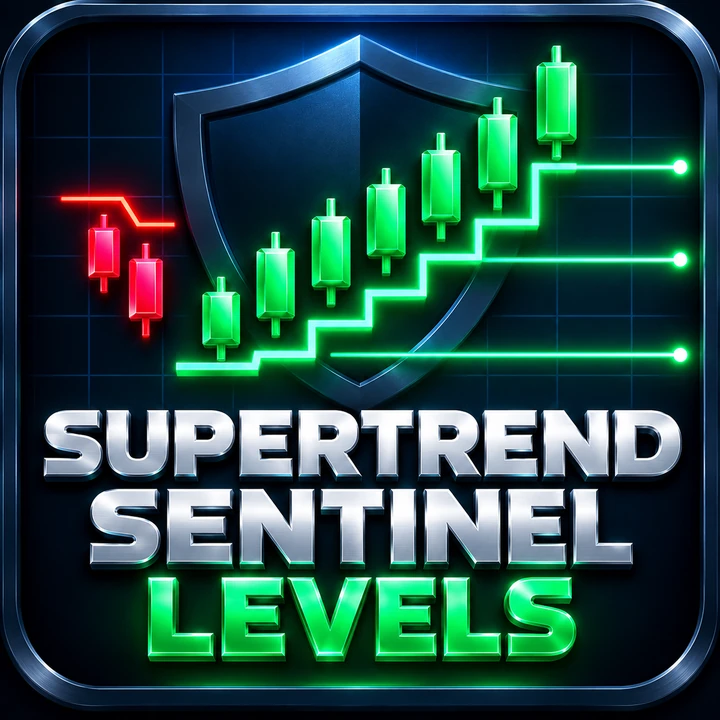
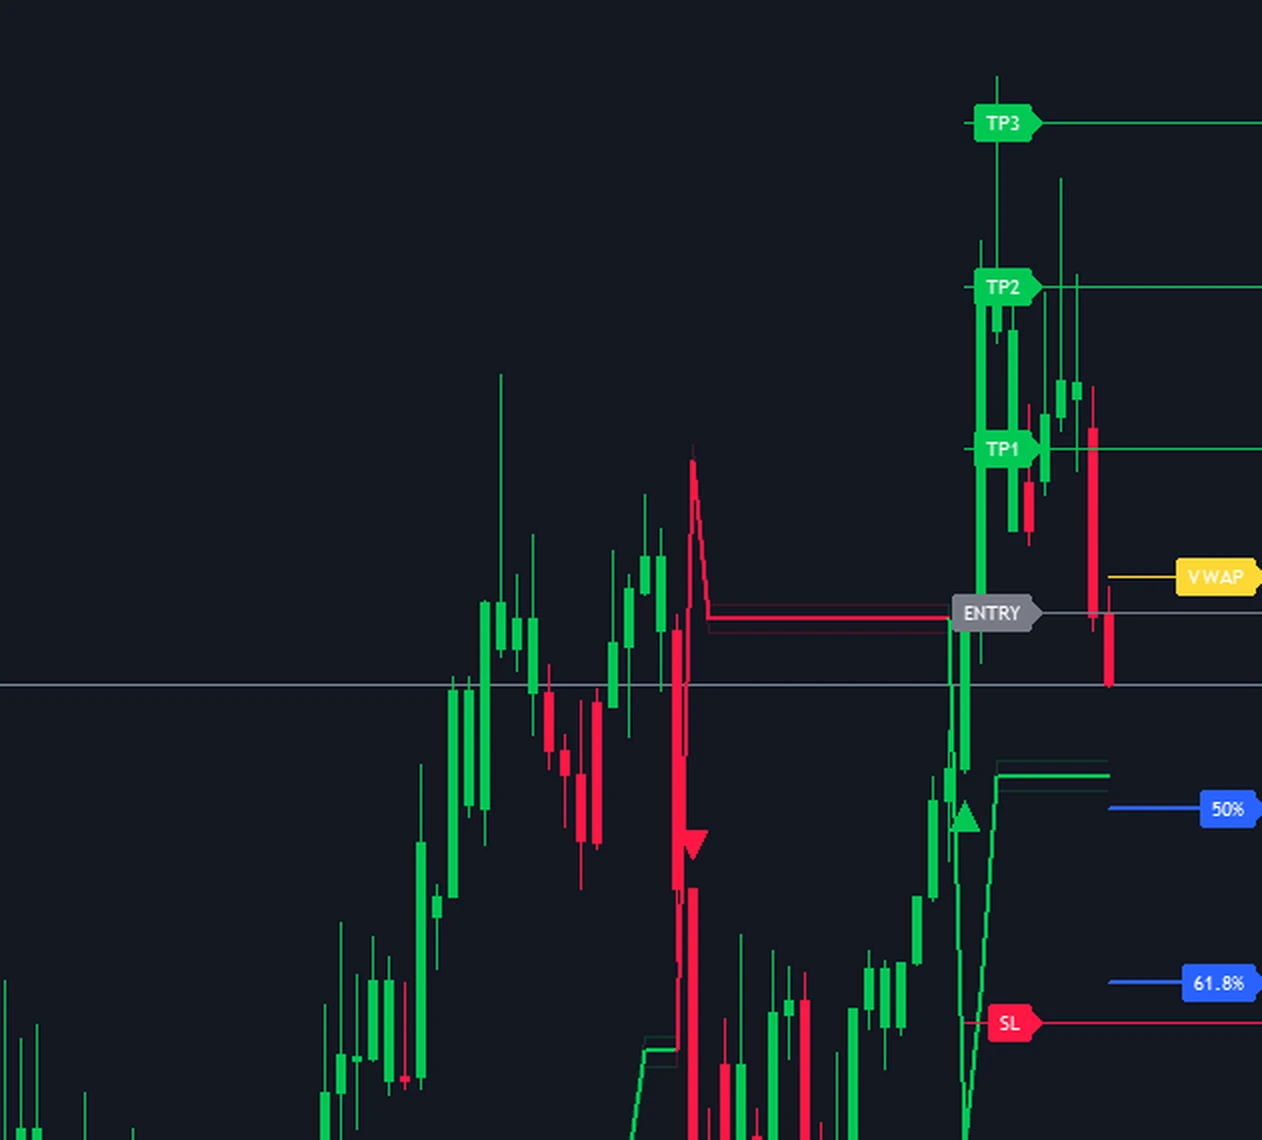
Schematic of the rule, not a capture: the SuperTrend flips, five checks are counted, and the arrow prints on the closed bar with the entry at its close, the stop 2.5 ATRs away and targets at 1, 2 and 3 ATRs (the defaults). The real charts are further down the page.
Captured on these markets
Runs on
 MetaTrader 4
 MetaTrader 5
A SuperTrend flip looks the same whether the market is behind it or not.
A plain SuperTrend is honest about one thing: which side of the line price closed on. It says nothing about whether the move has room left, whether the next timeframe up agrees, or whether anyone is trading. In a range it flips back and forth, and every one of those flips looks exactly like the one before a real trend.
SuperTrend Sentinel Levels keeps every flip on the chart and puts a number on it. Five checks look at the trend behind it, how stretched it already is, whether the market is trending at all, whether the volume is there, and what the higher timeframe says. Filter Mode decides how many must agree before an arrow raises an alert. Whichever way you set it, the entry, a stop and three targets are on the chart when the bar closes, so you see what the signal would risk before you decide.
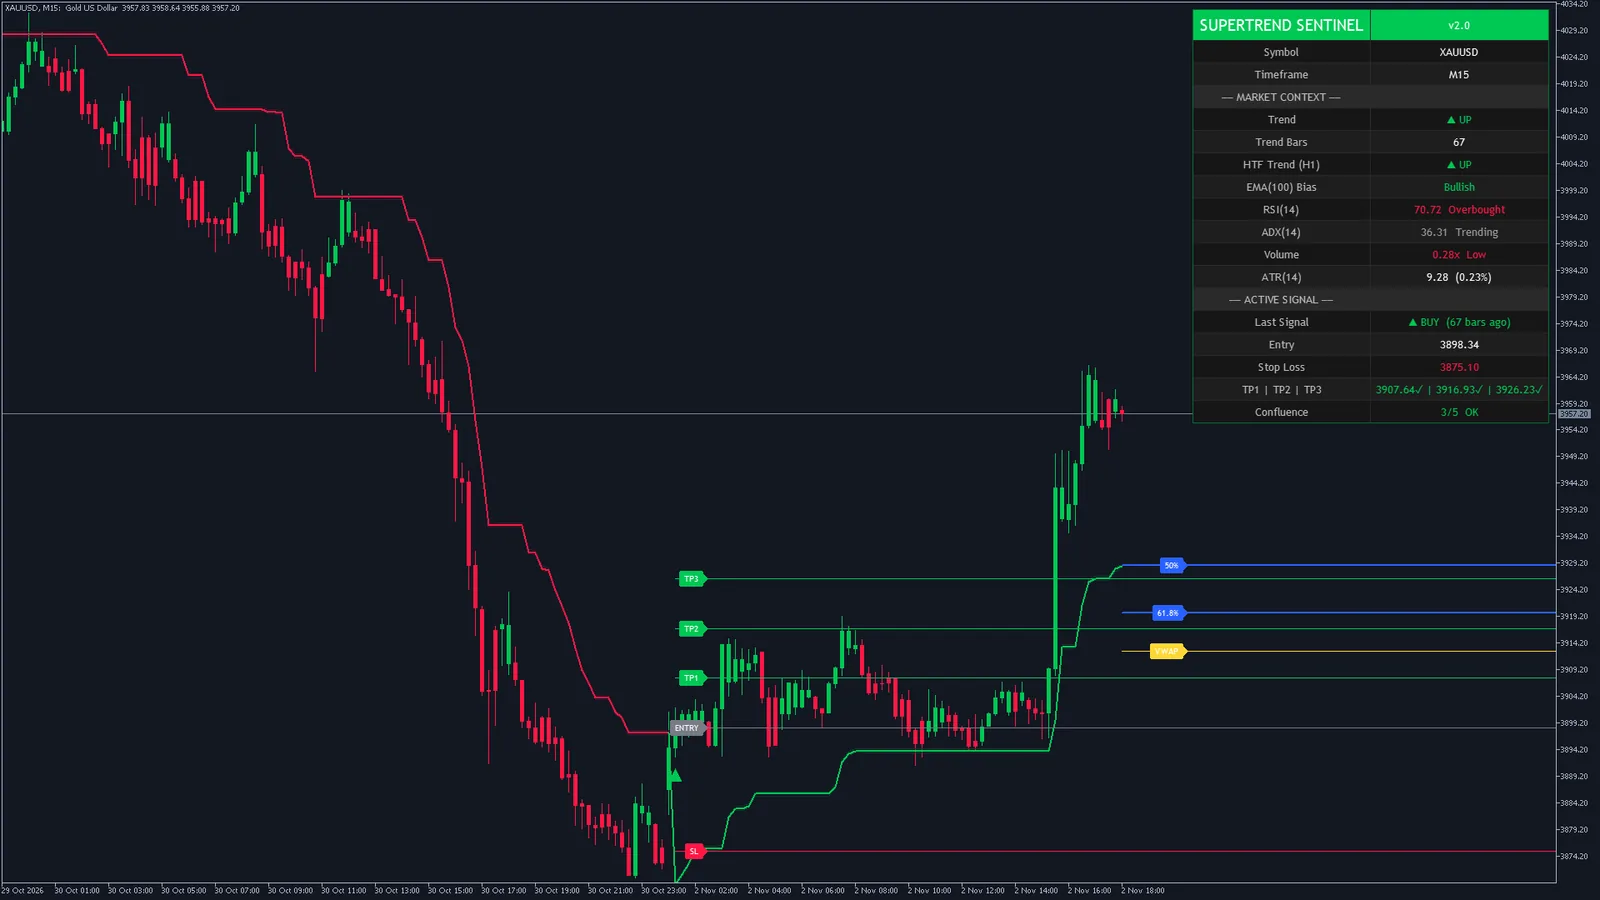
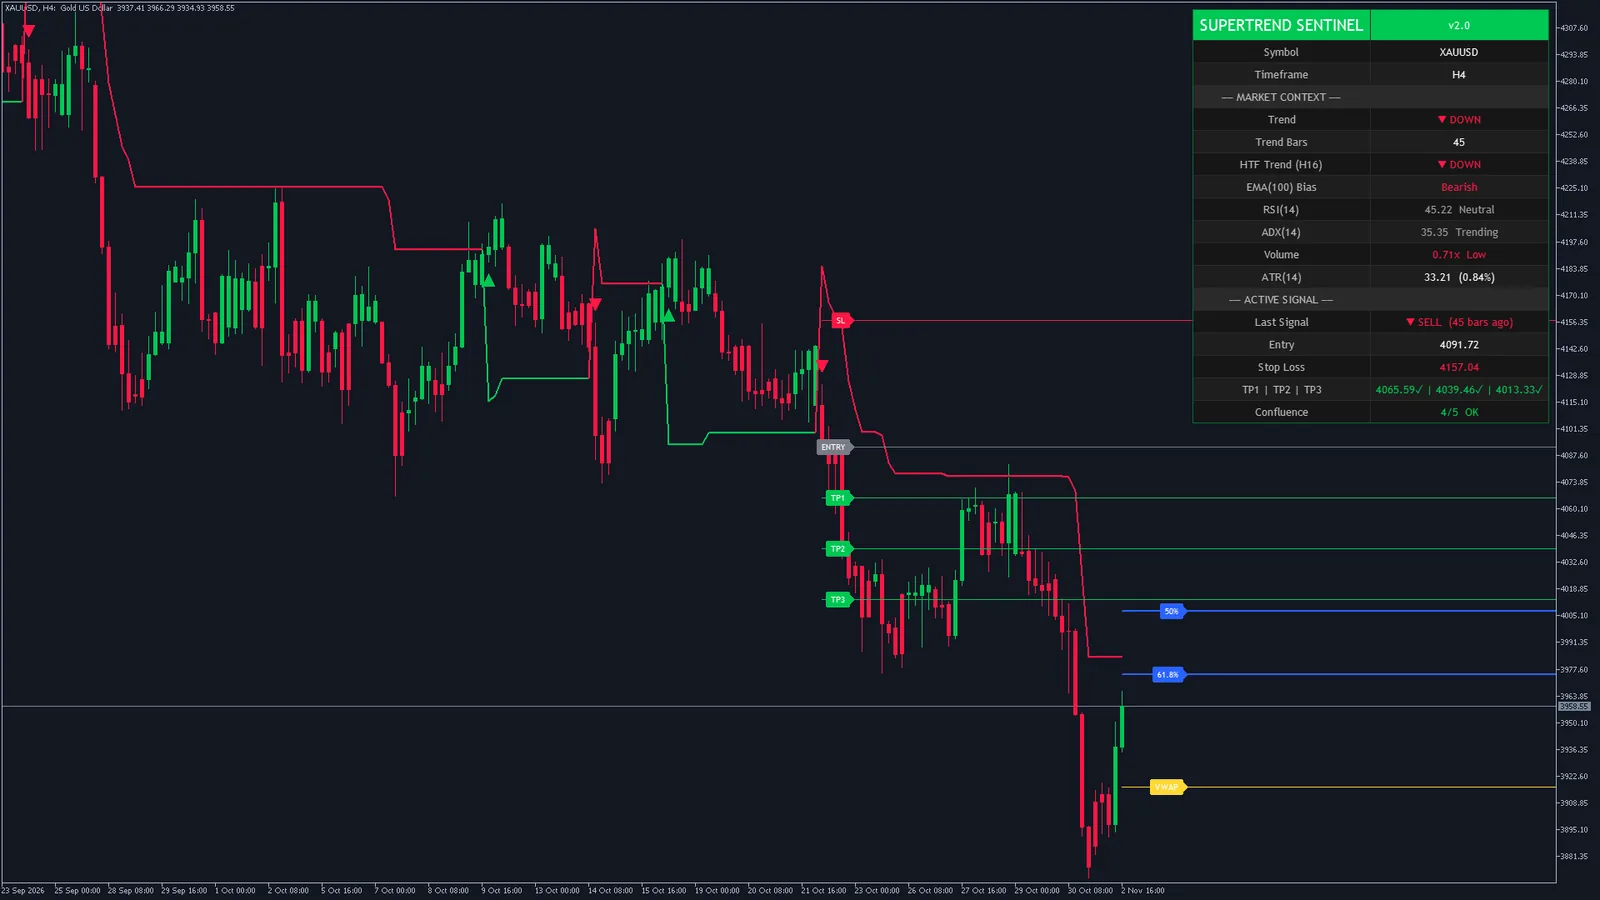
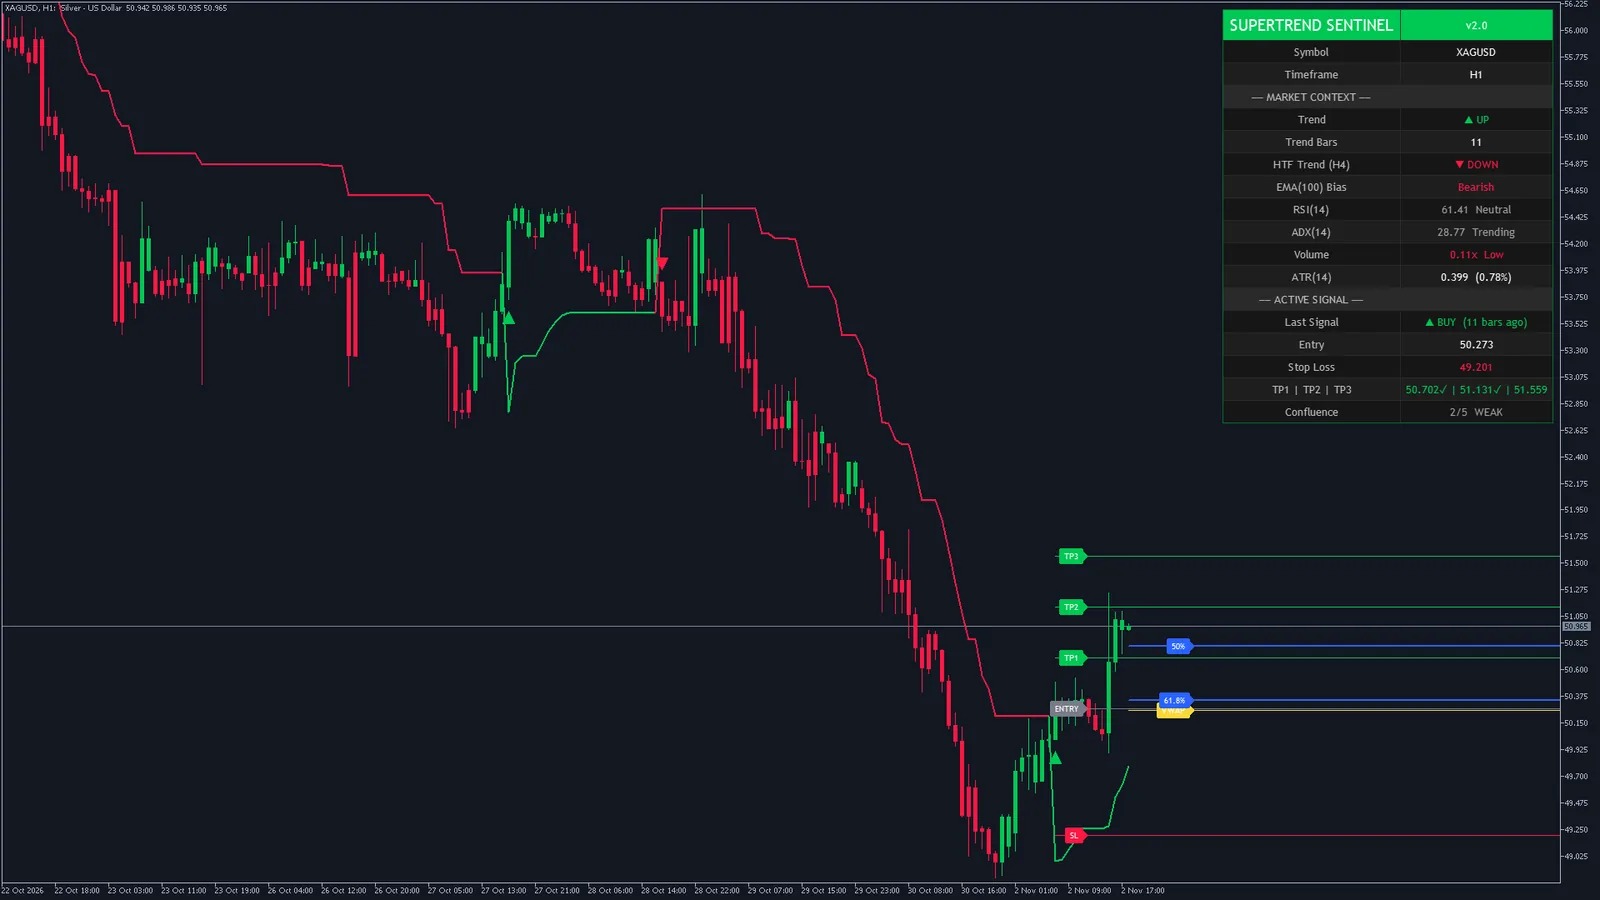
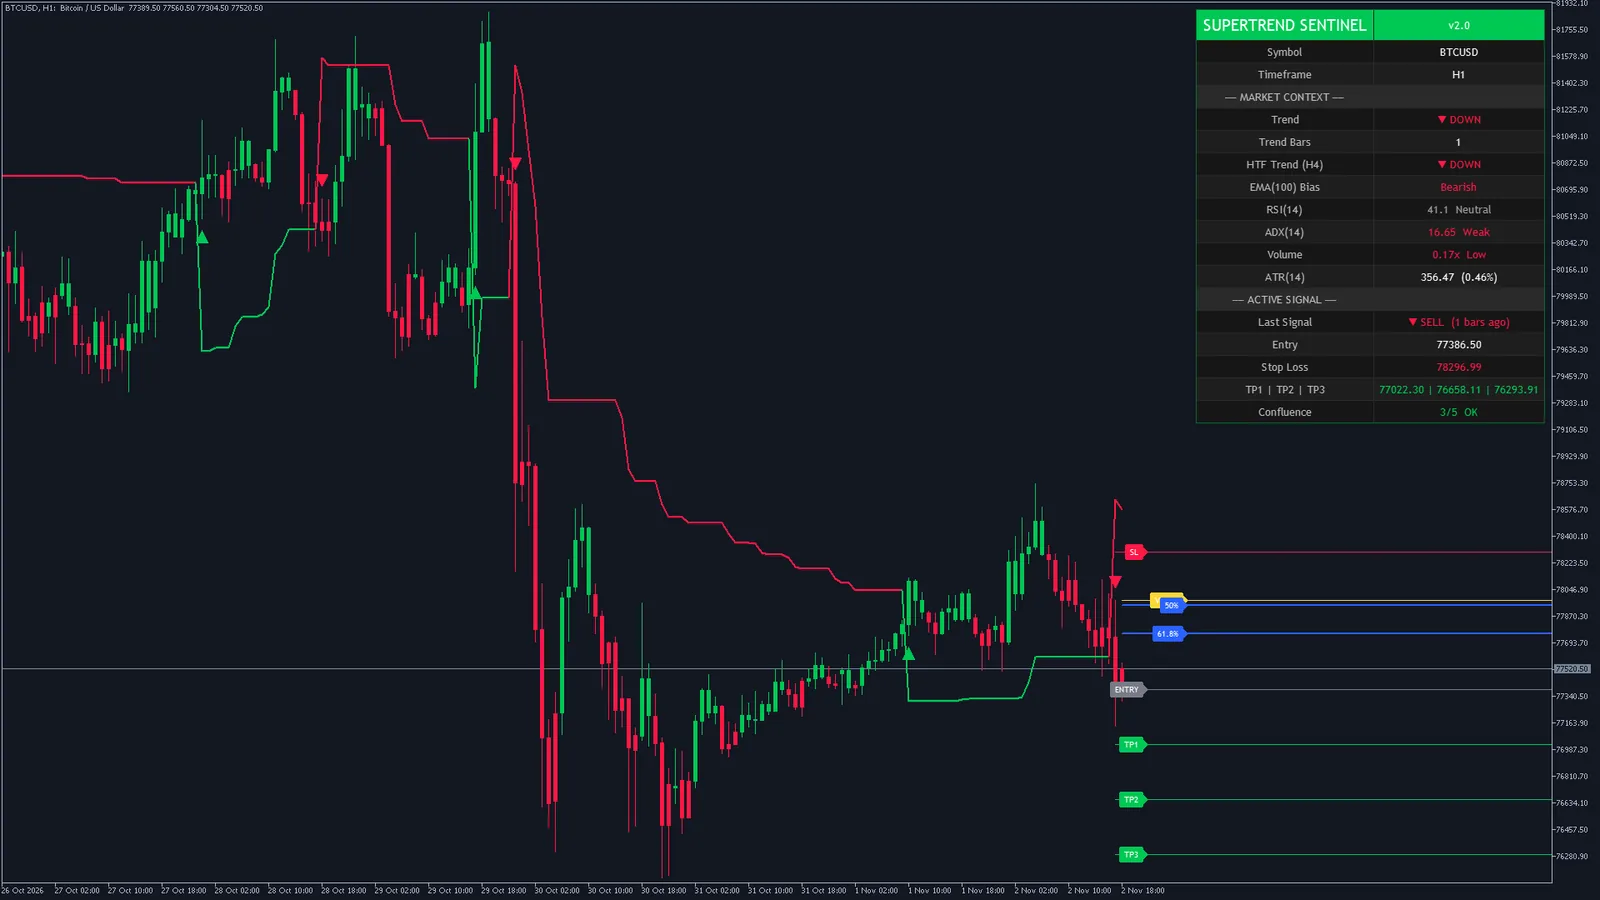
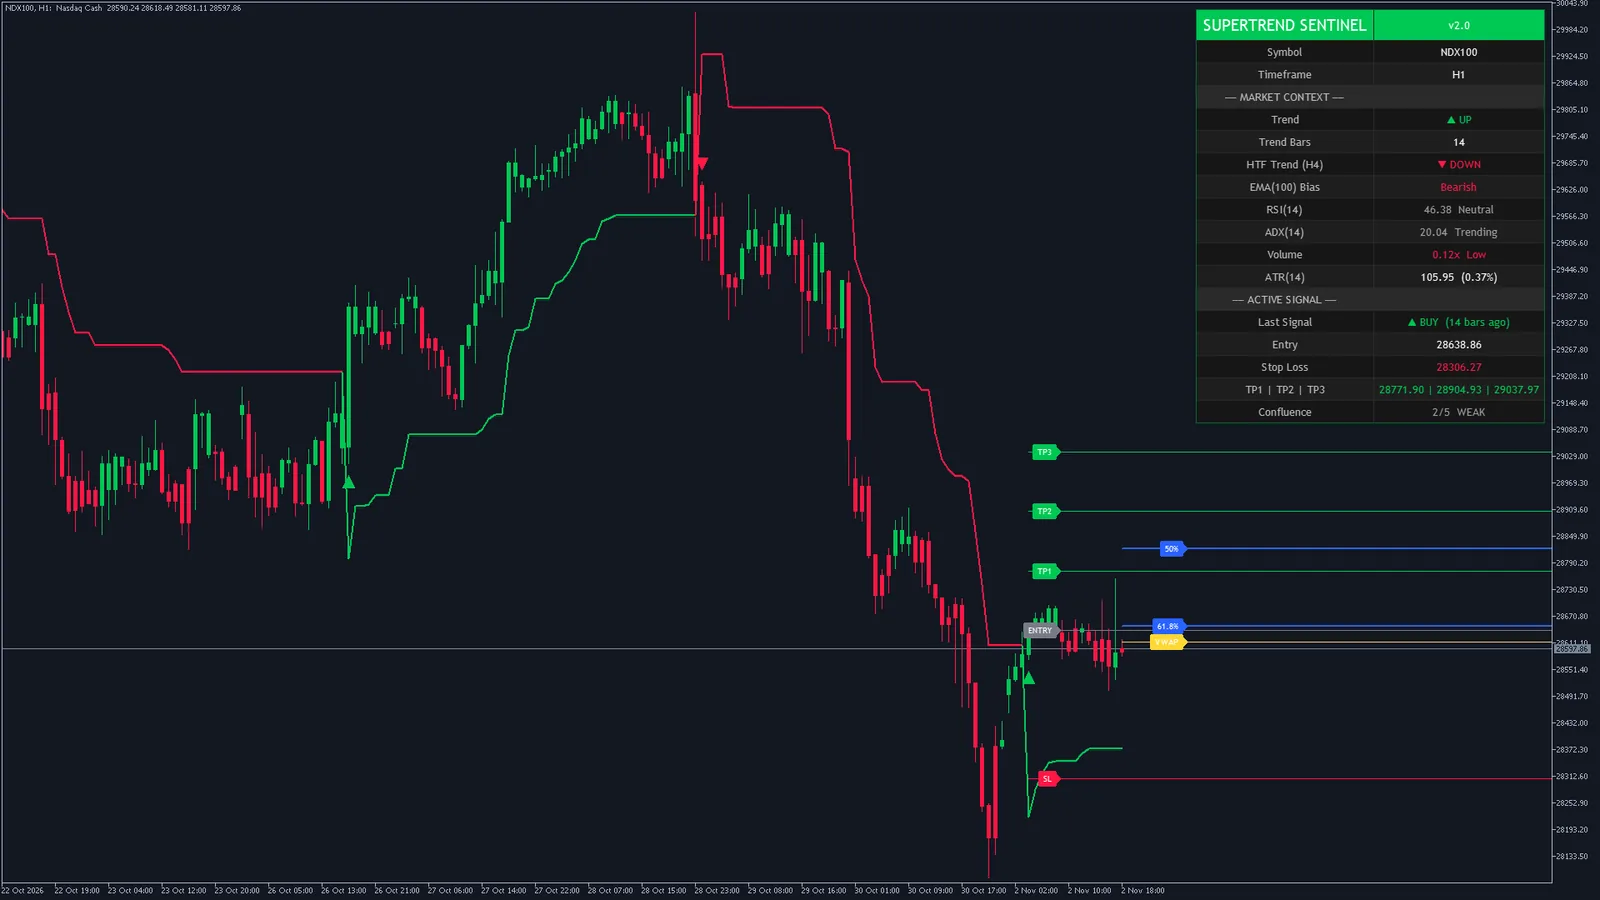
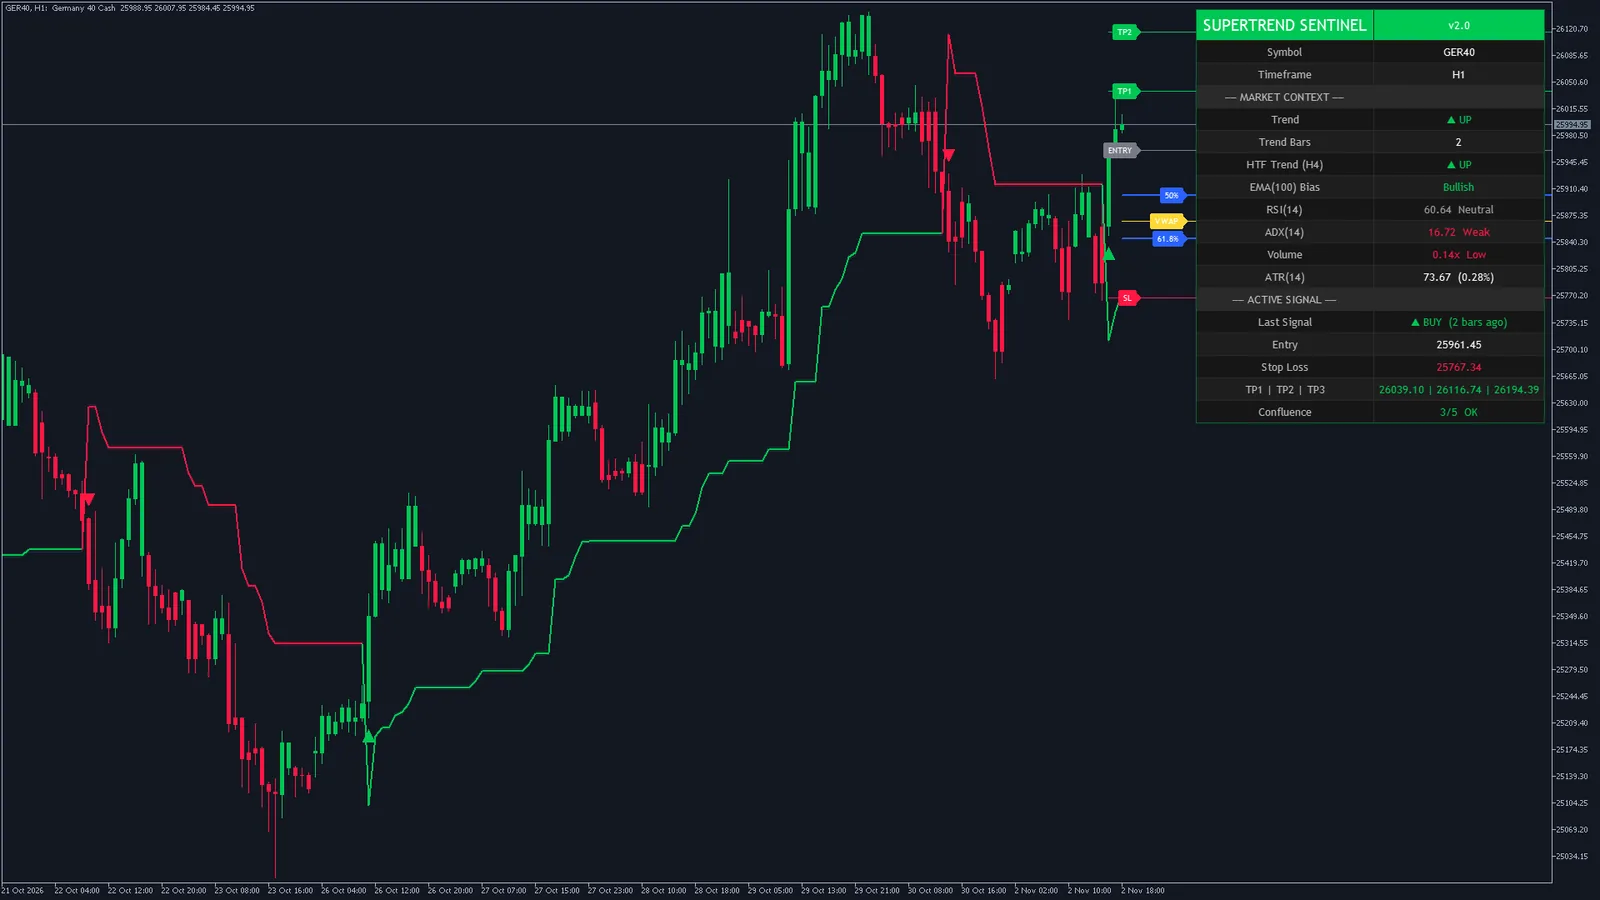
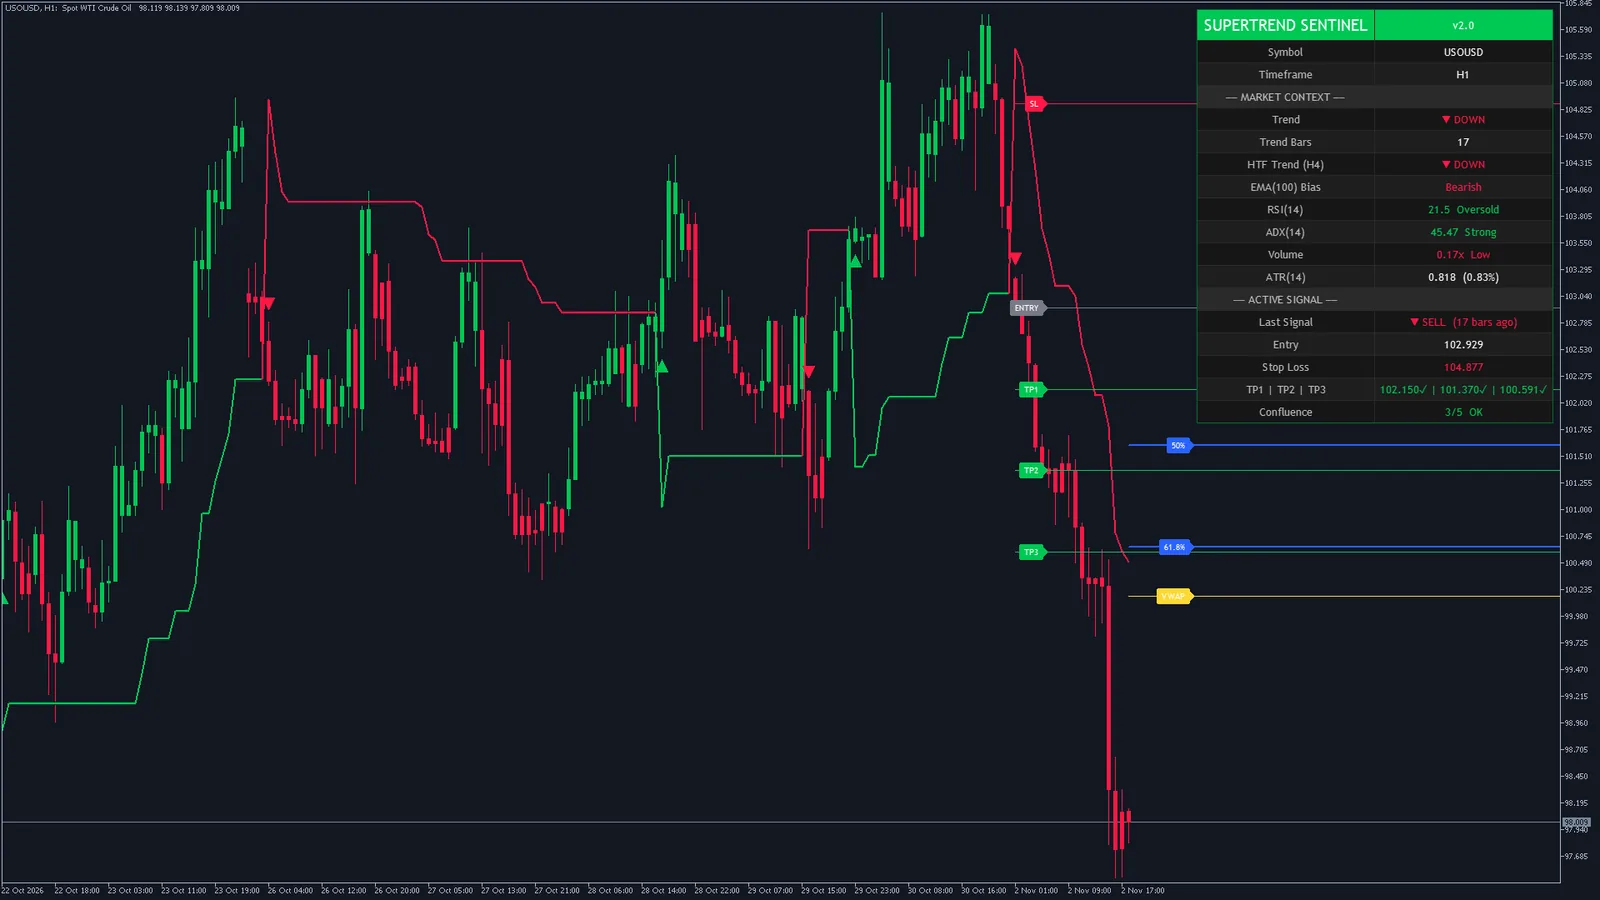
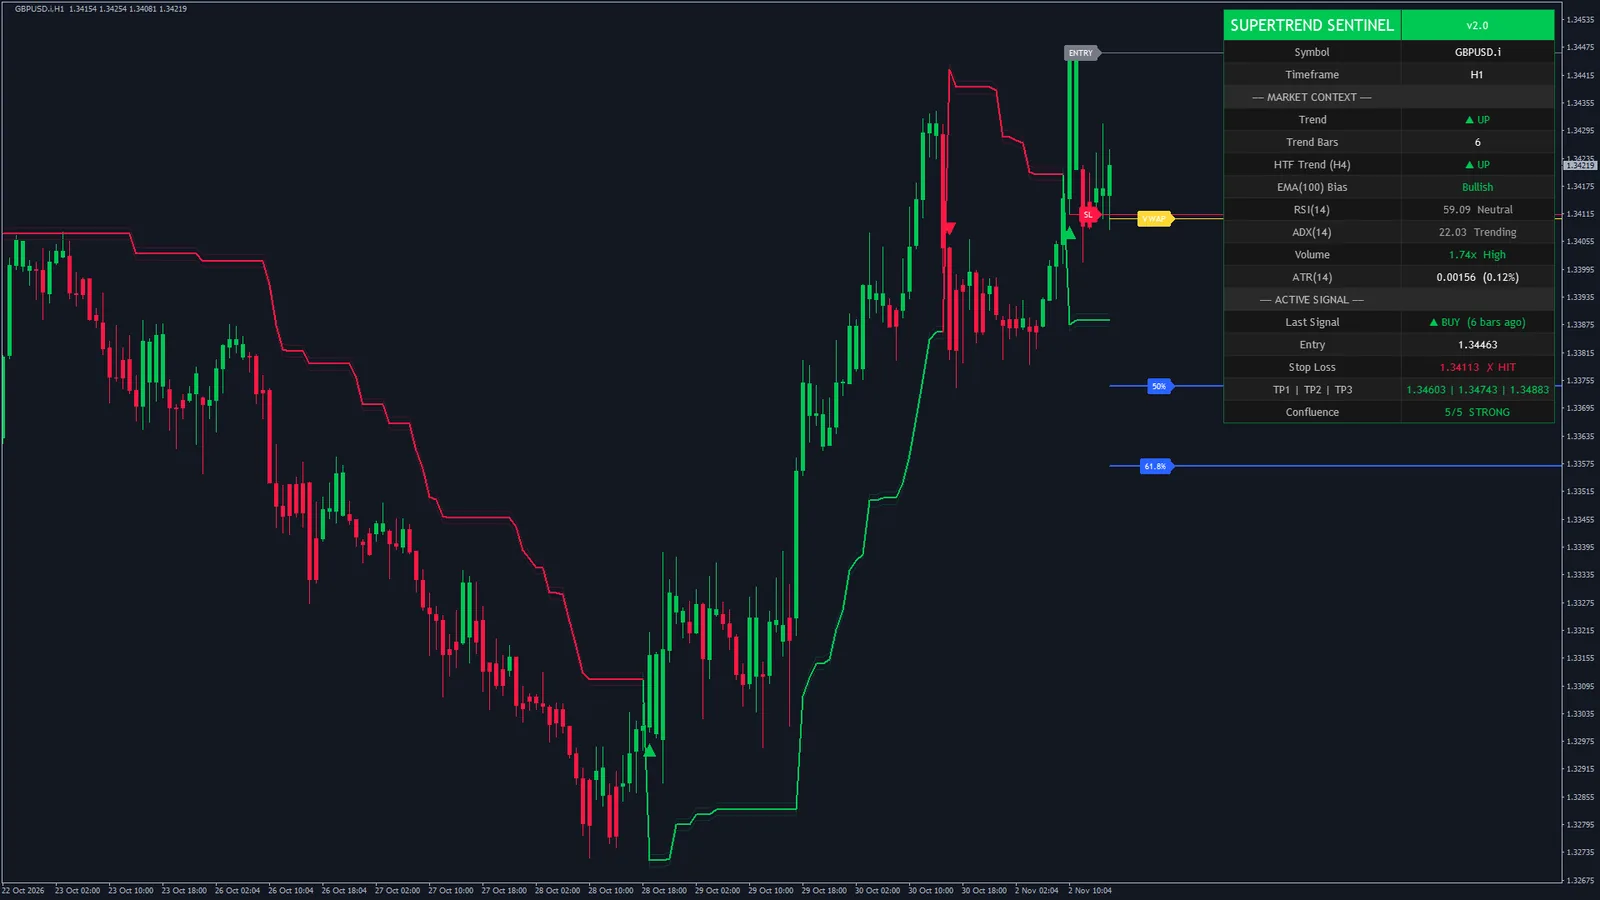
Read the charts, not the promise. Every chart on this page is a real MetaTrader capture of the shipped build at its default settings, and nothing is drawn in by hand. Click any chart to open it full size.
30 real MetaTrader charts at default settings
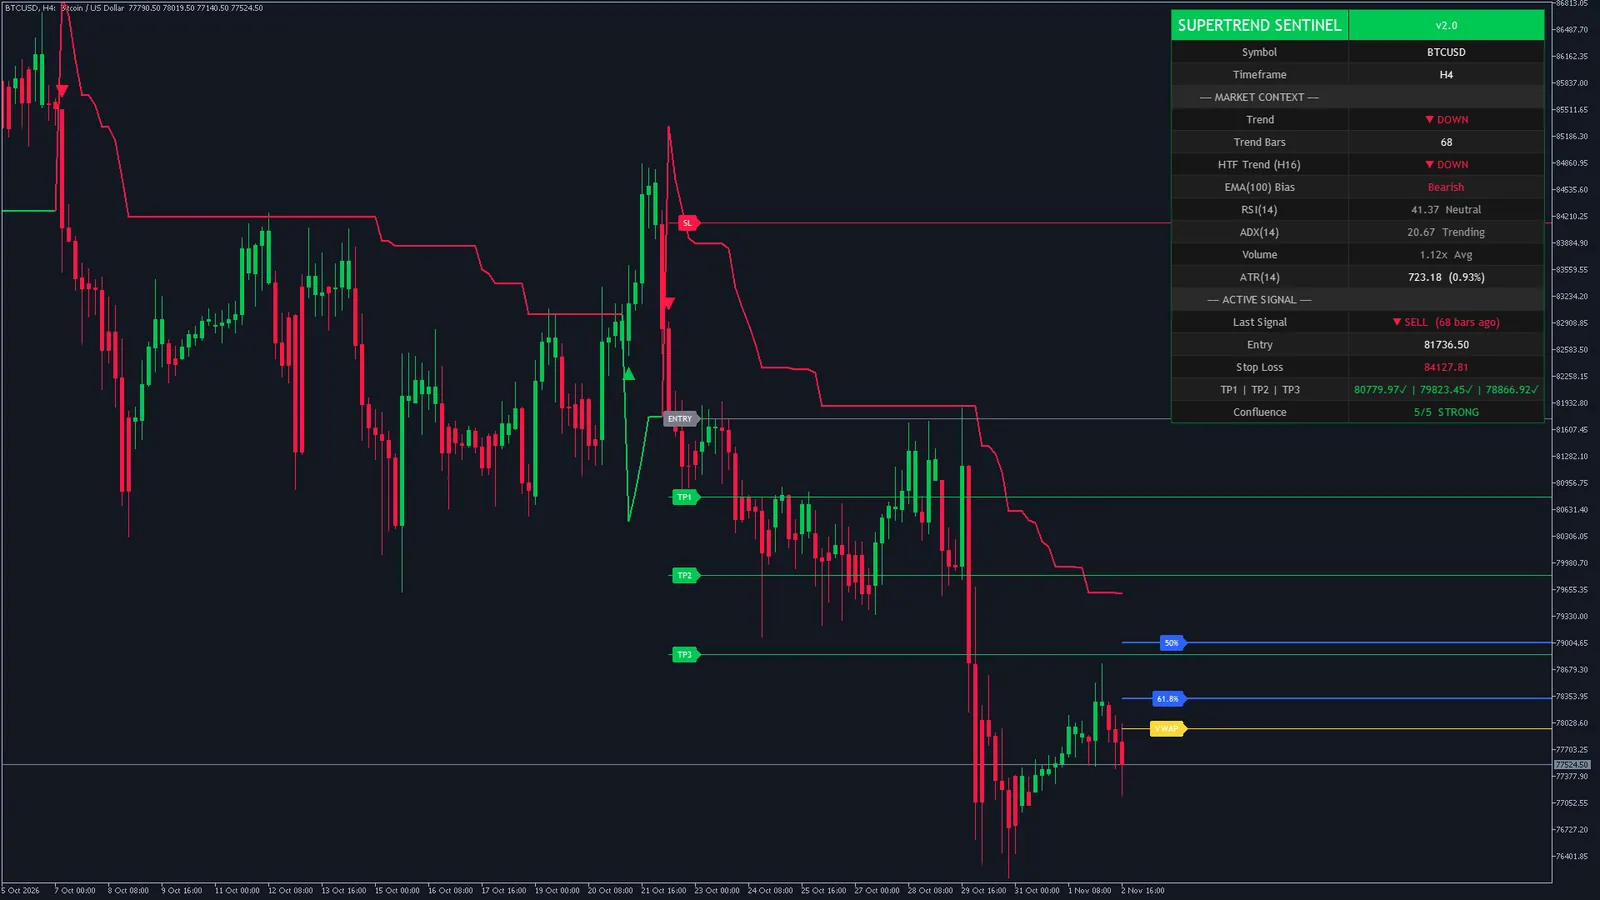
Each one was saved by MetaTrader itself from a chart of the shipped build, with the indicator attached exactly as you would attach it: the SuperTrend and its buffer zone, the arrows, the Heikin-Ashi bar colours, the newest signal's entry, stop and three targets, VWAP, the Fibonacci levels and the dashboard. The charts were picked by market and timeframe, not by how the last signal turned out, so some of the plans you see reached their targets and some hit the stop. Click any chart to open it full size.
Page updated 11 November 2026 · charts captured 2 November 2026 · MetaTrader 5 build 6230 on the Eightcap demo server, MetaTrader 4 build 1492 on the Blueberry Markets demo server · default inputs
MetaTrader 4 chartEURUSD H1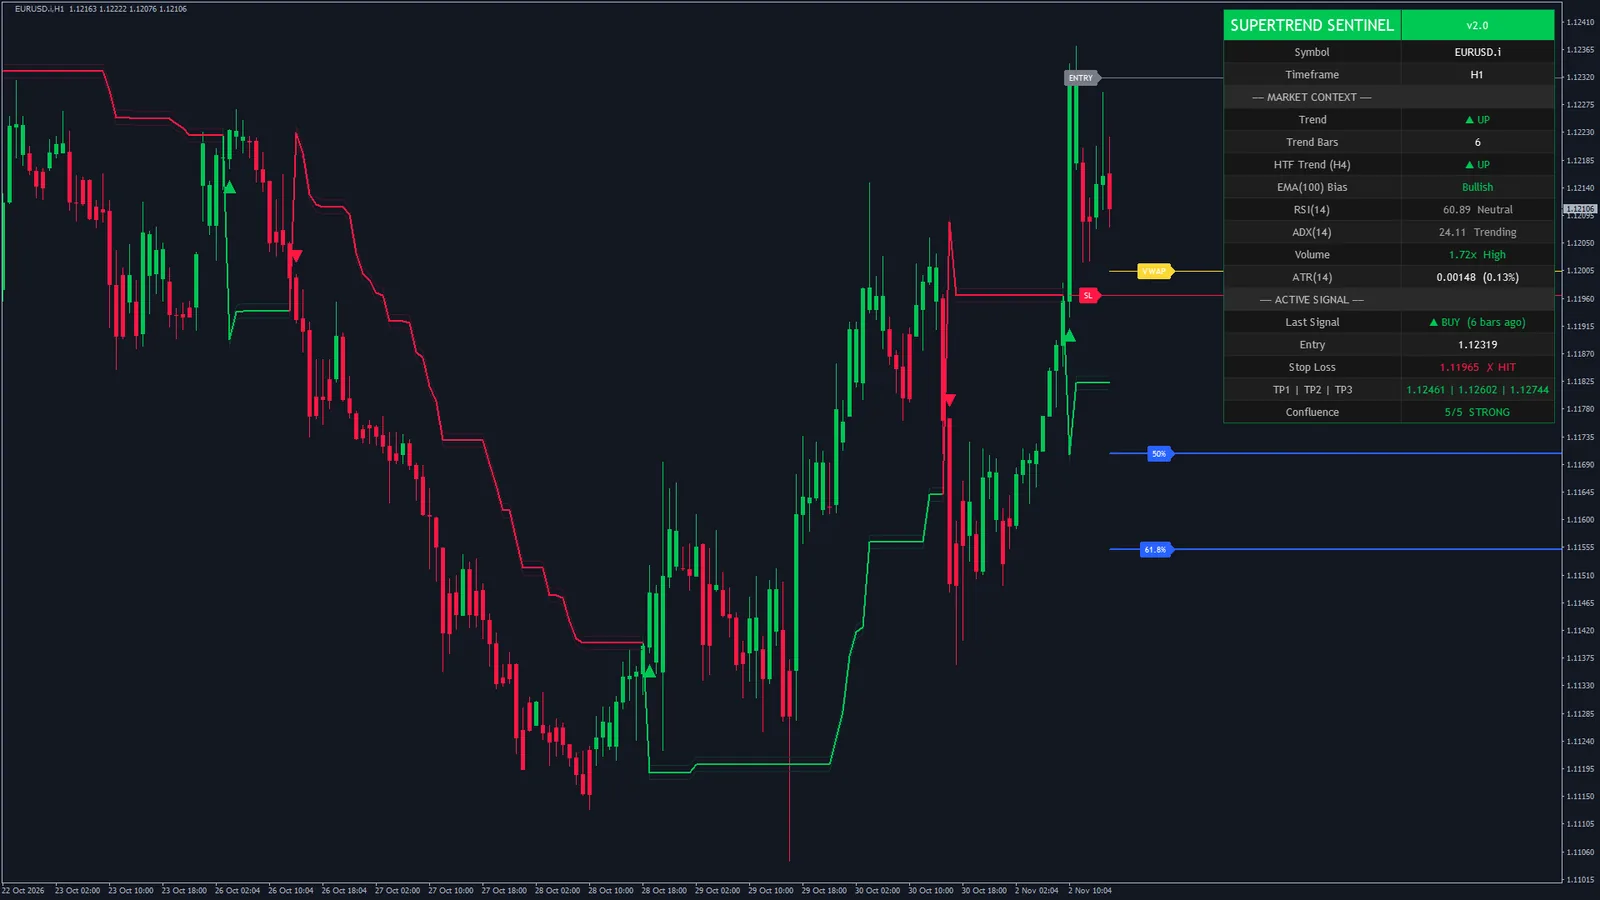 MetaTrader 5 chartGold H1
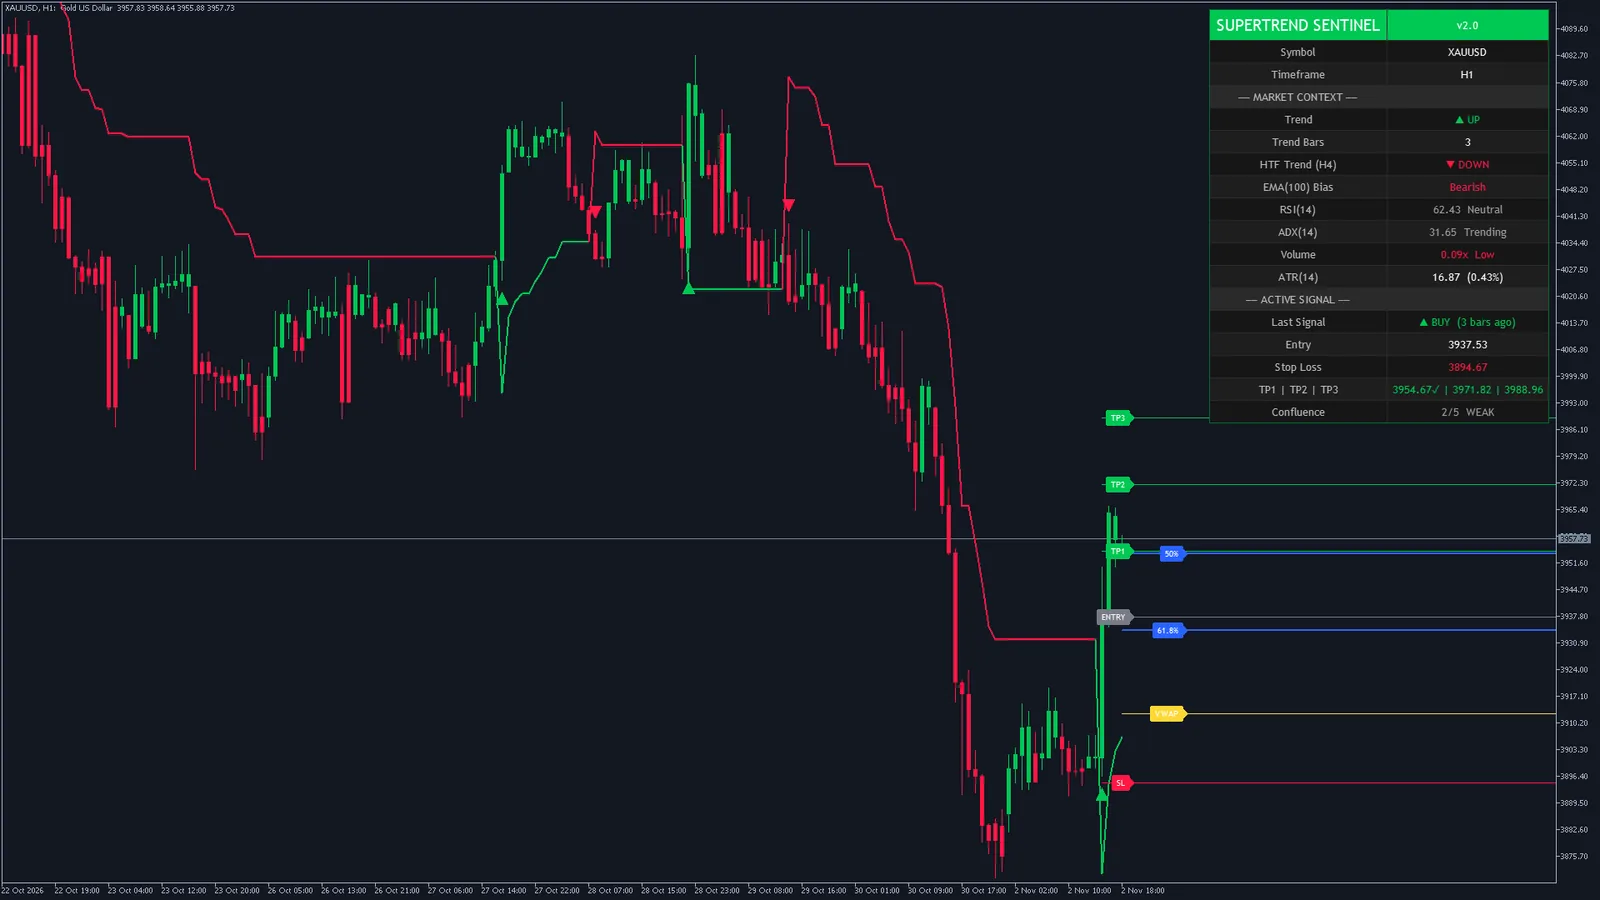 MetaTrader 5 chartBitcoin H4
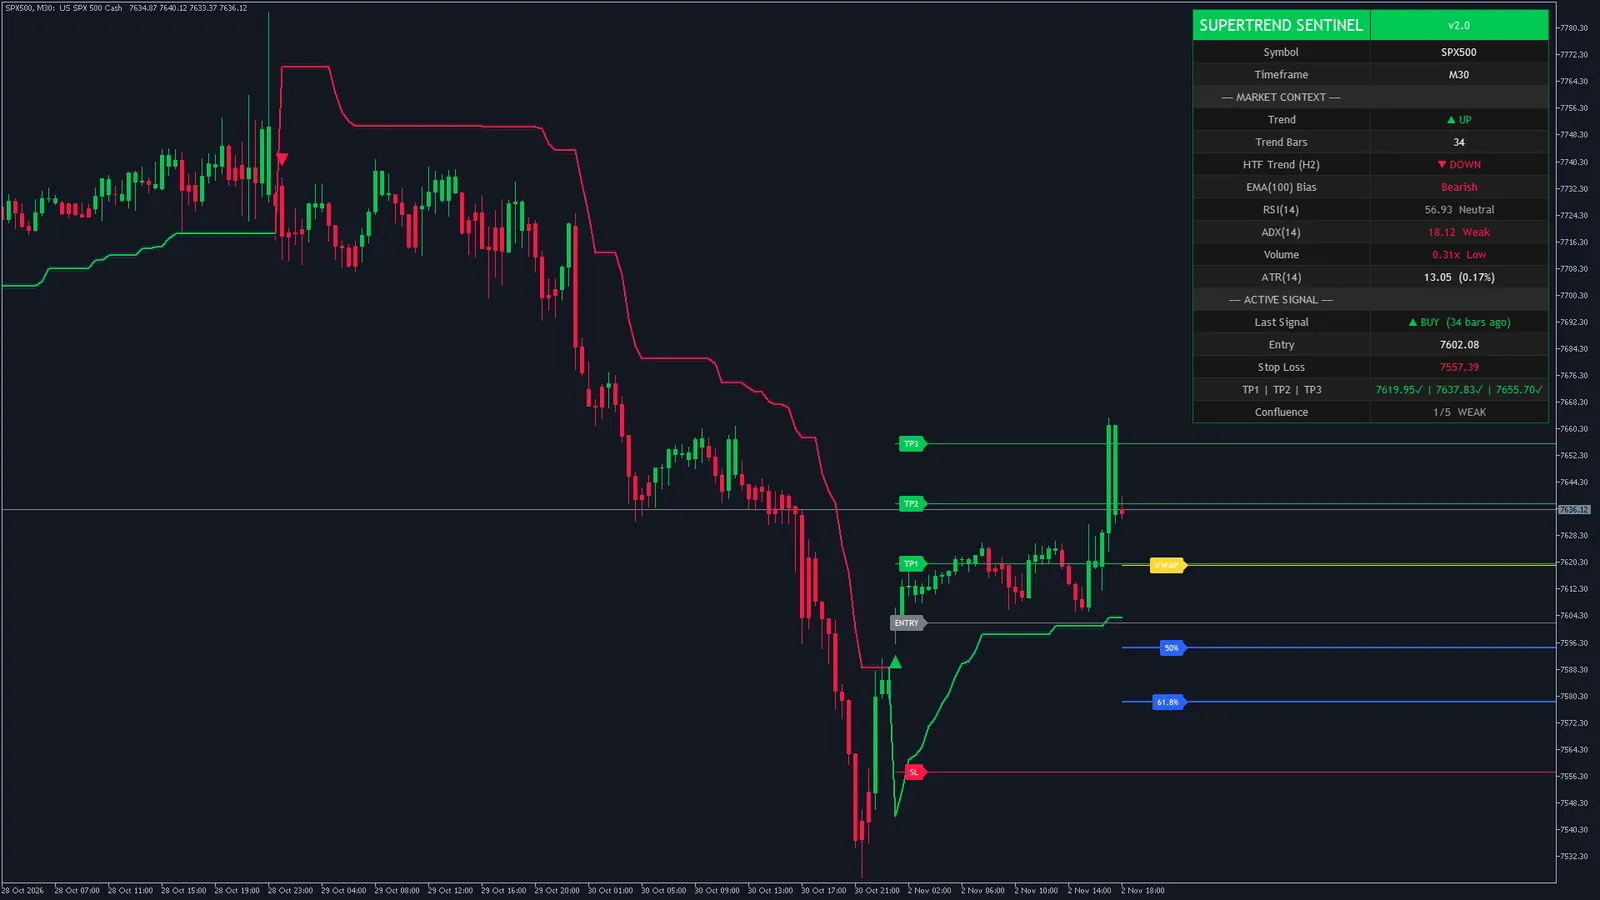
 MetaTrader 5 chartS&P 500 M30
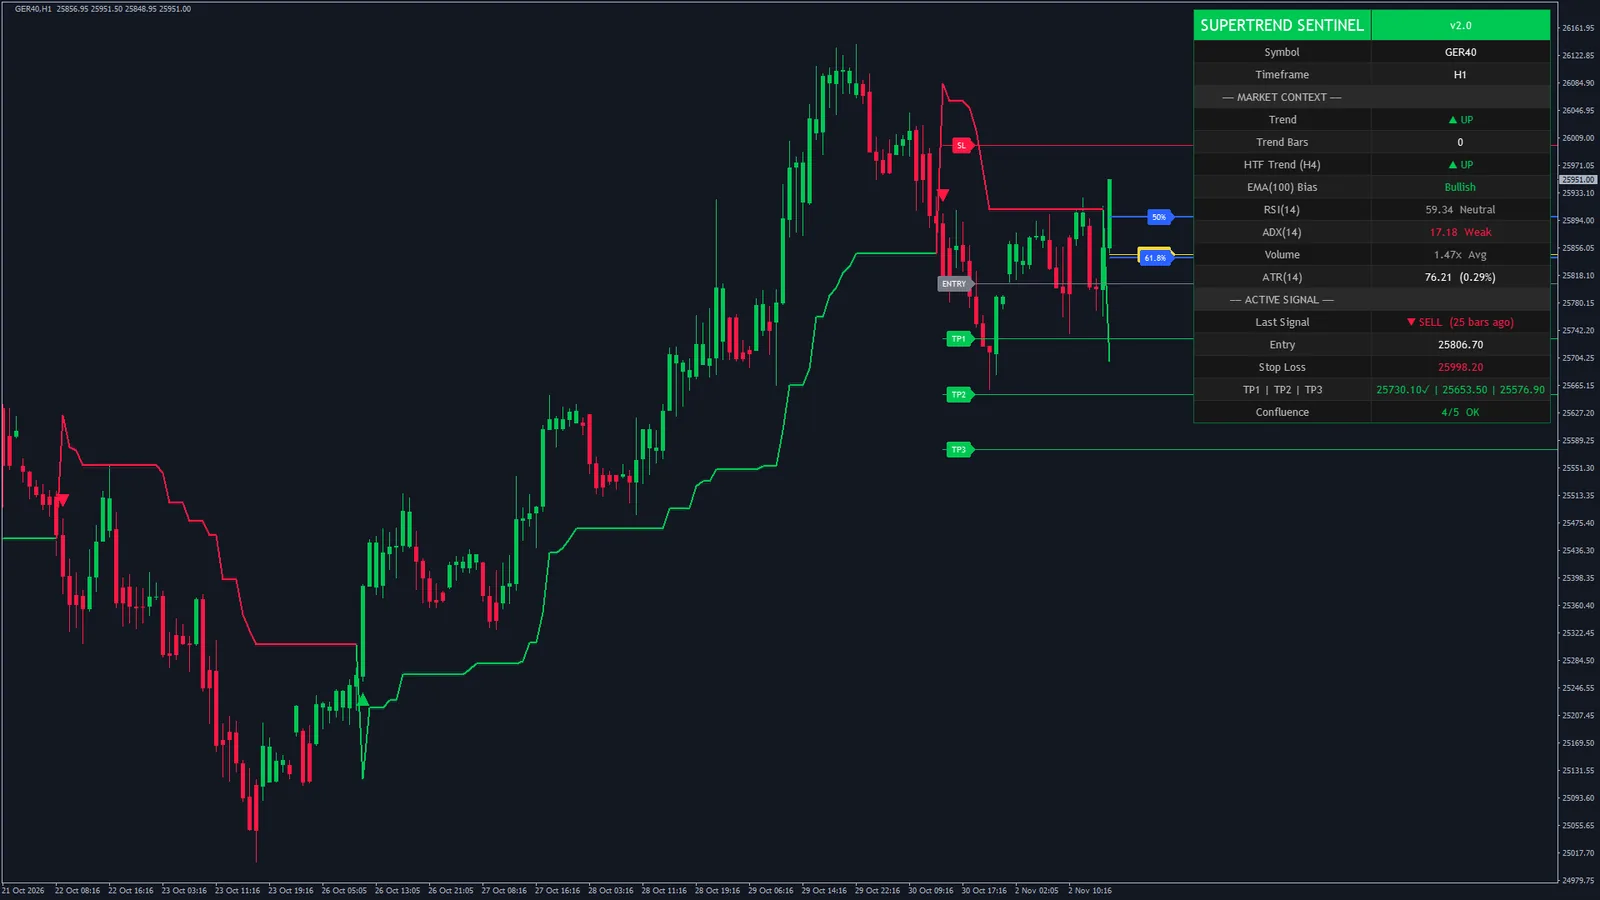
 MetaTrader 4 chartDAX 40 H1
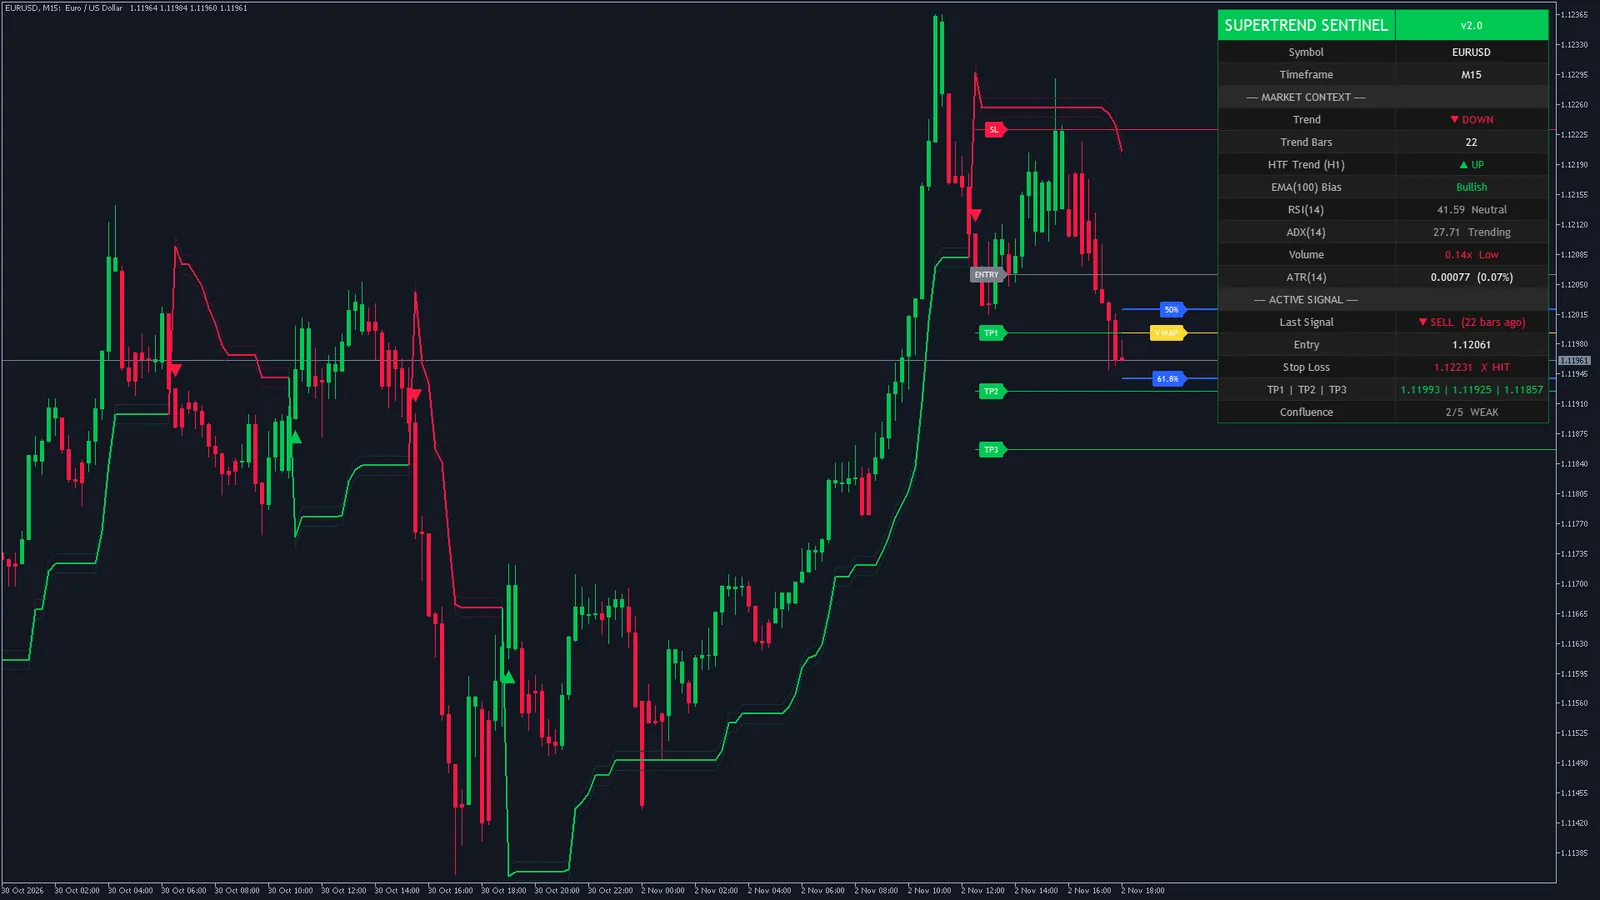
Every chart we captured, by market
Forex10 charts
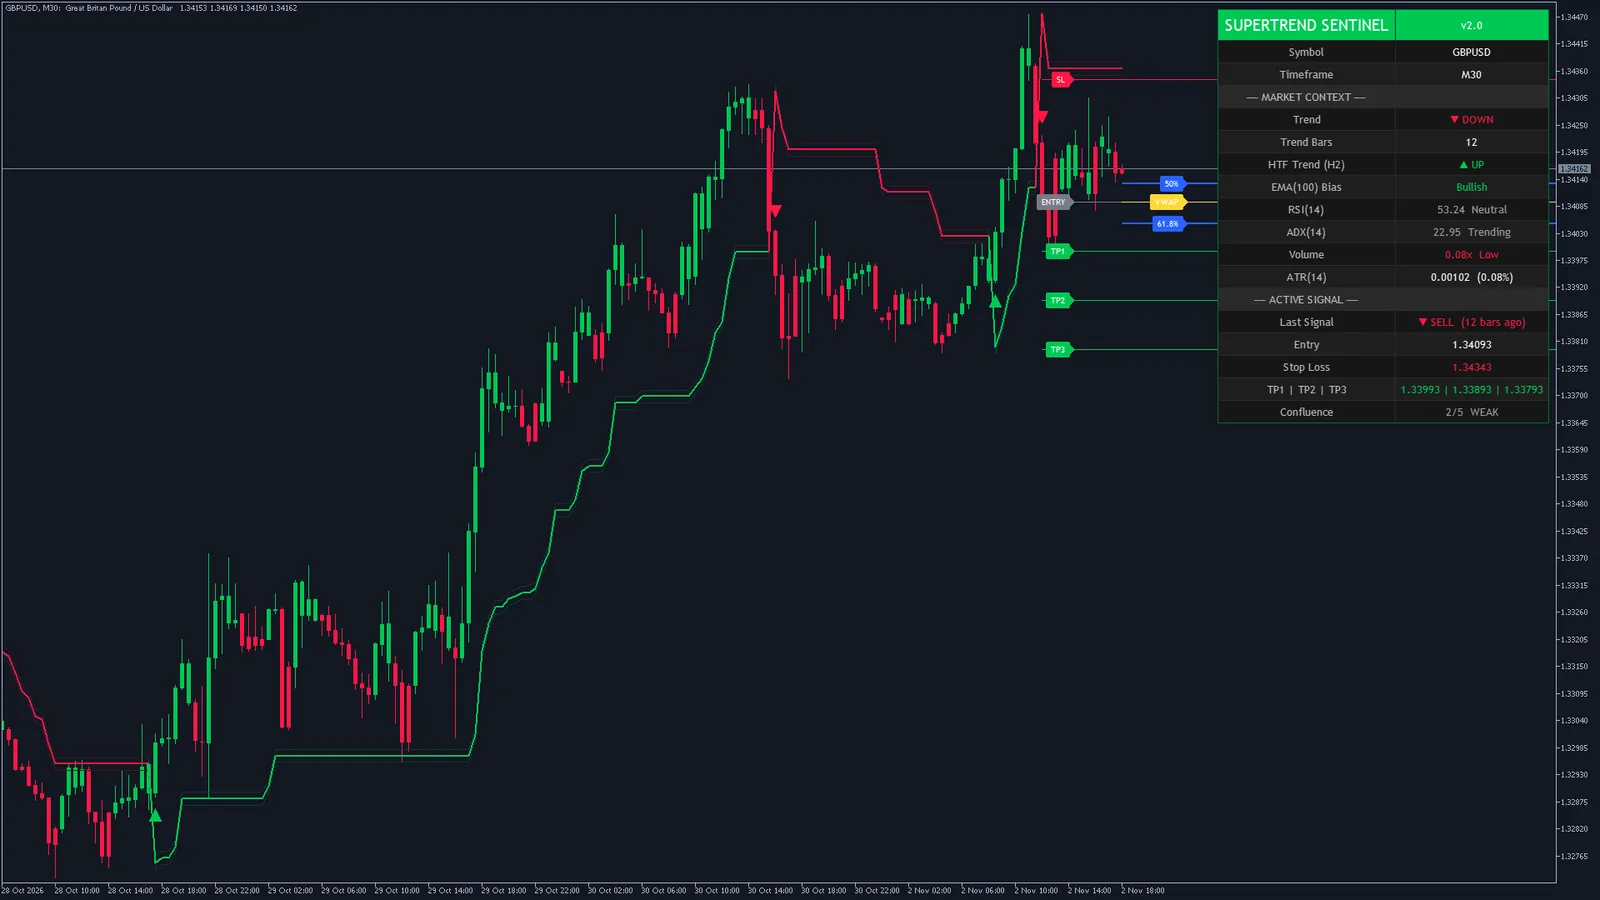
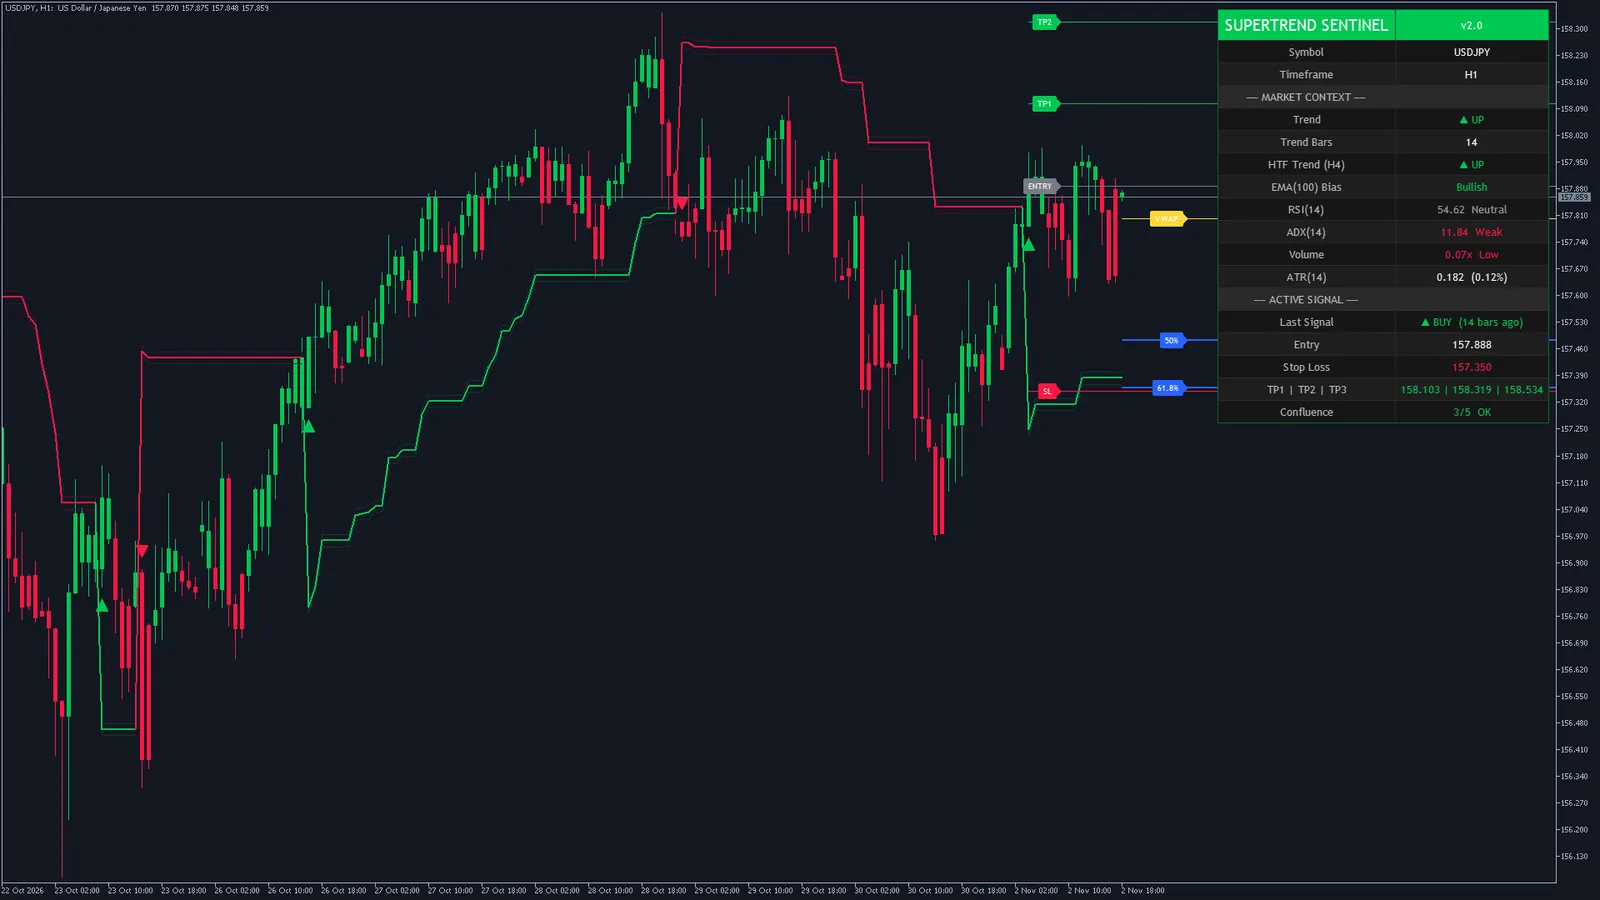
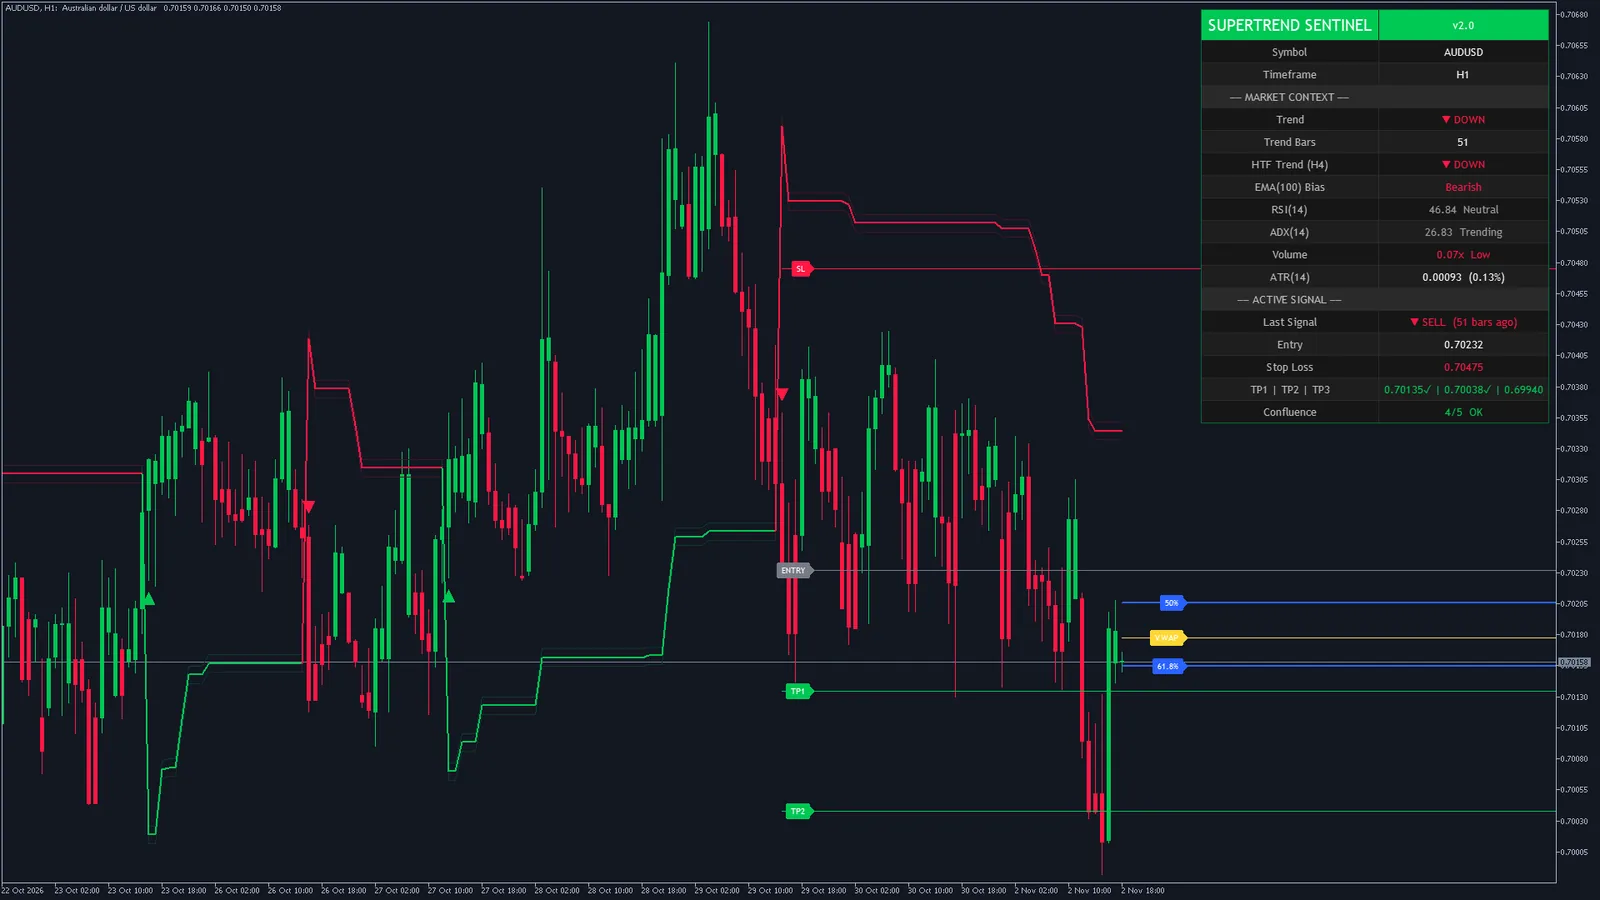
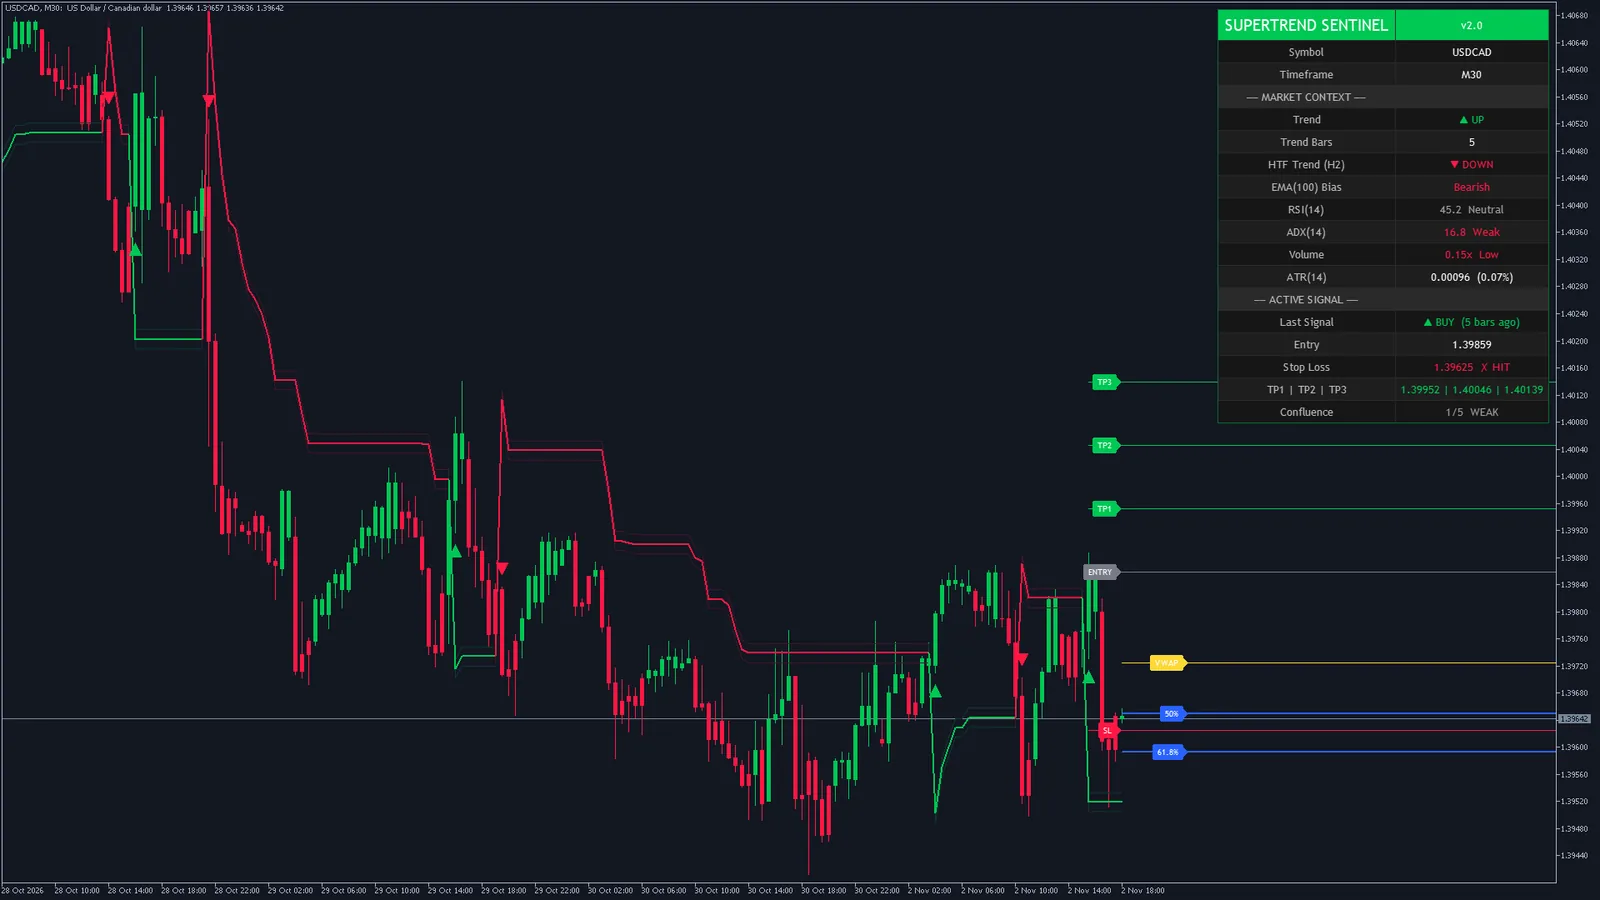
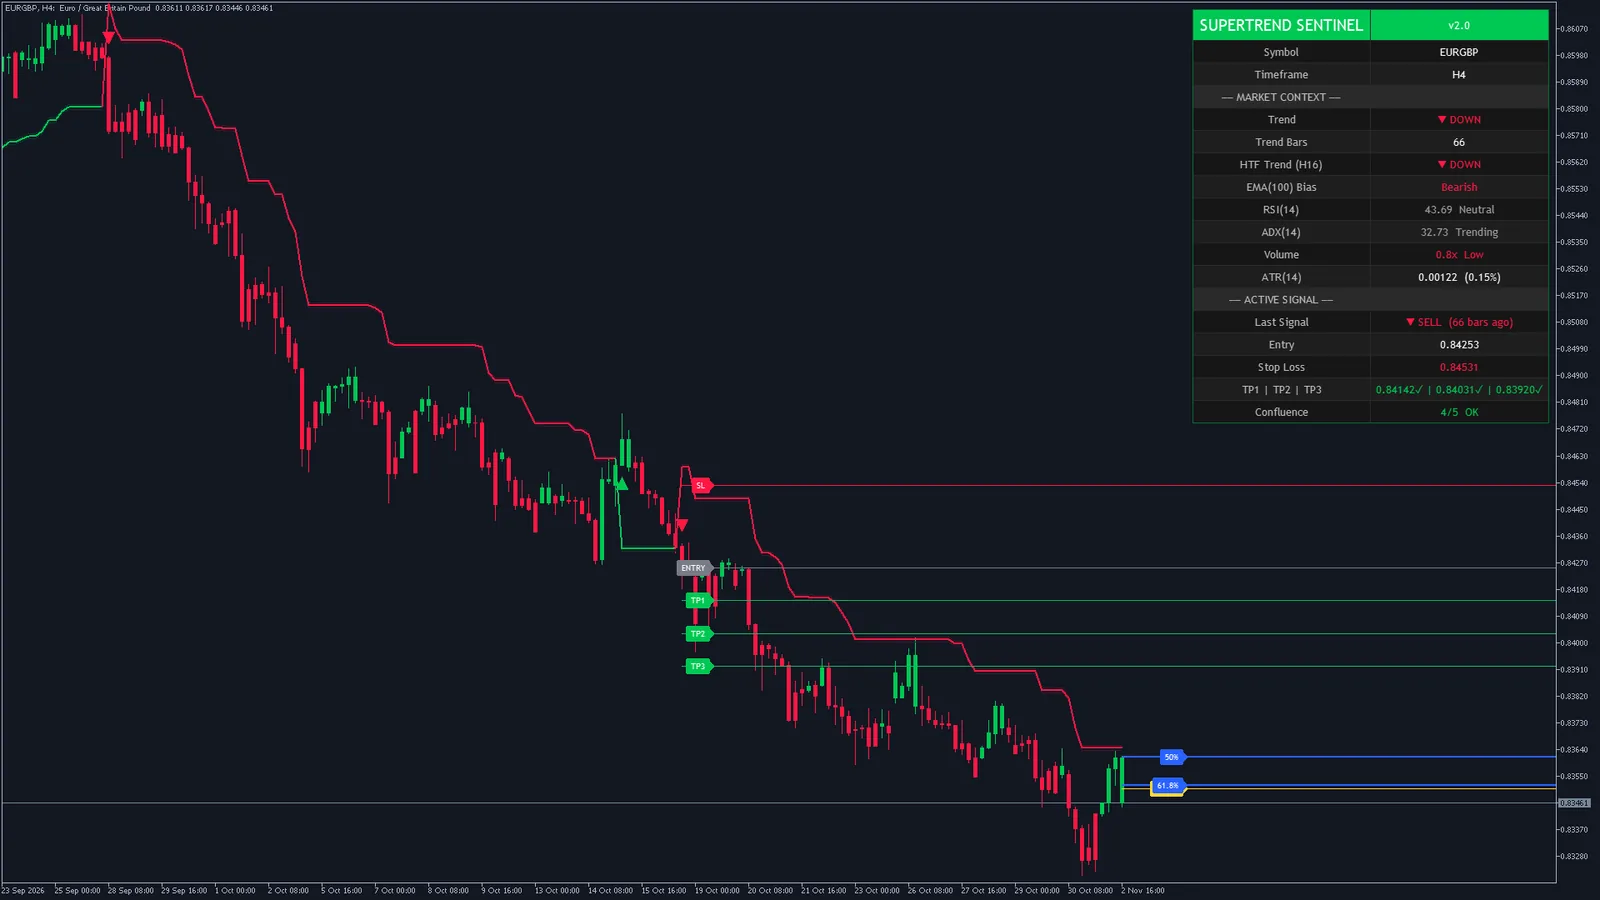
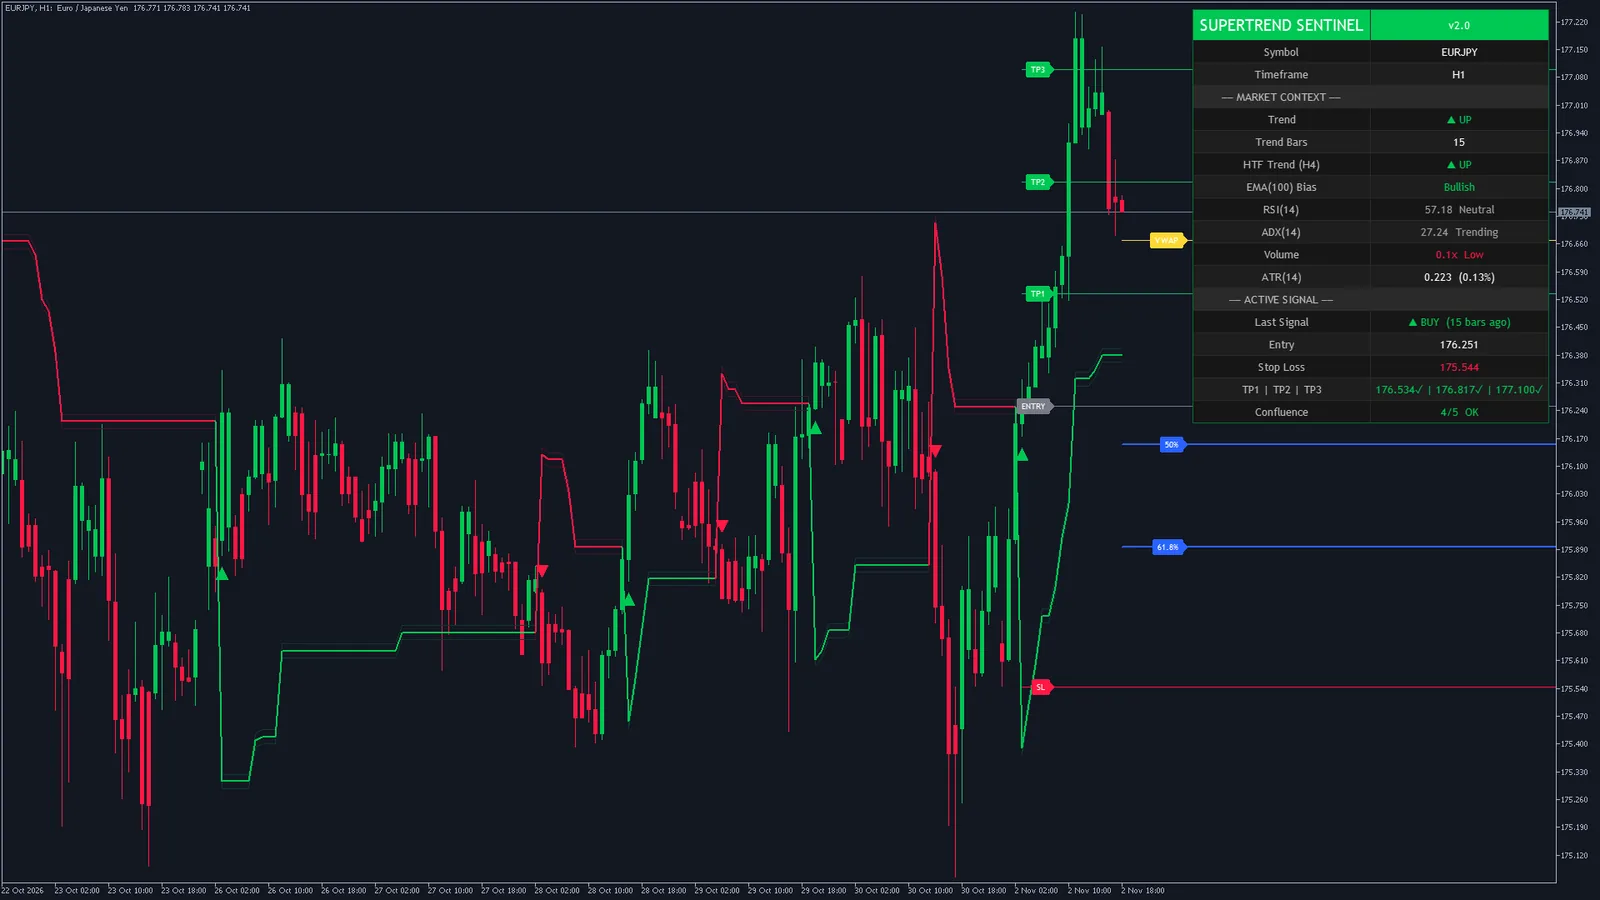
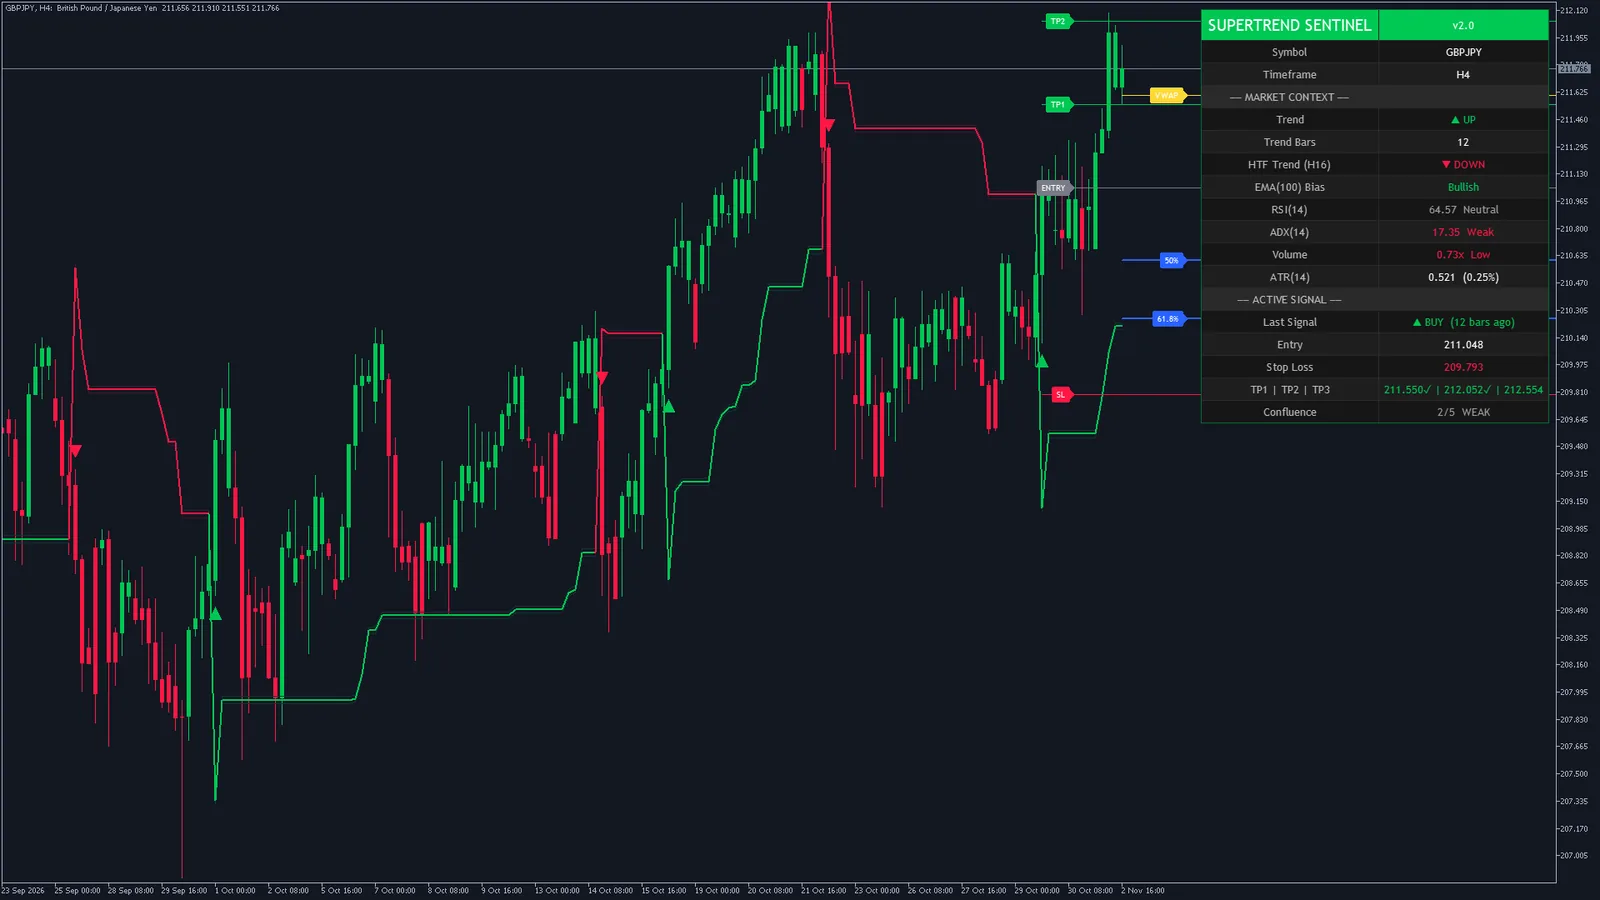
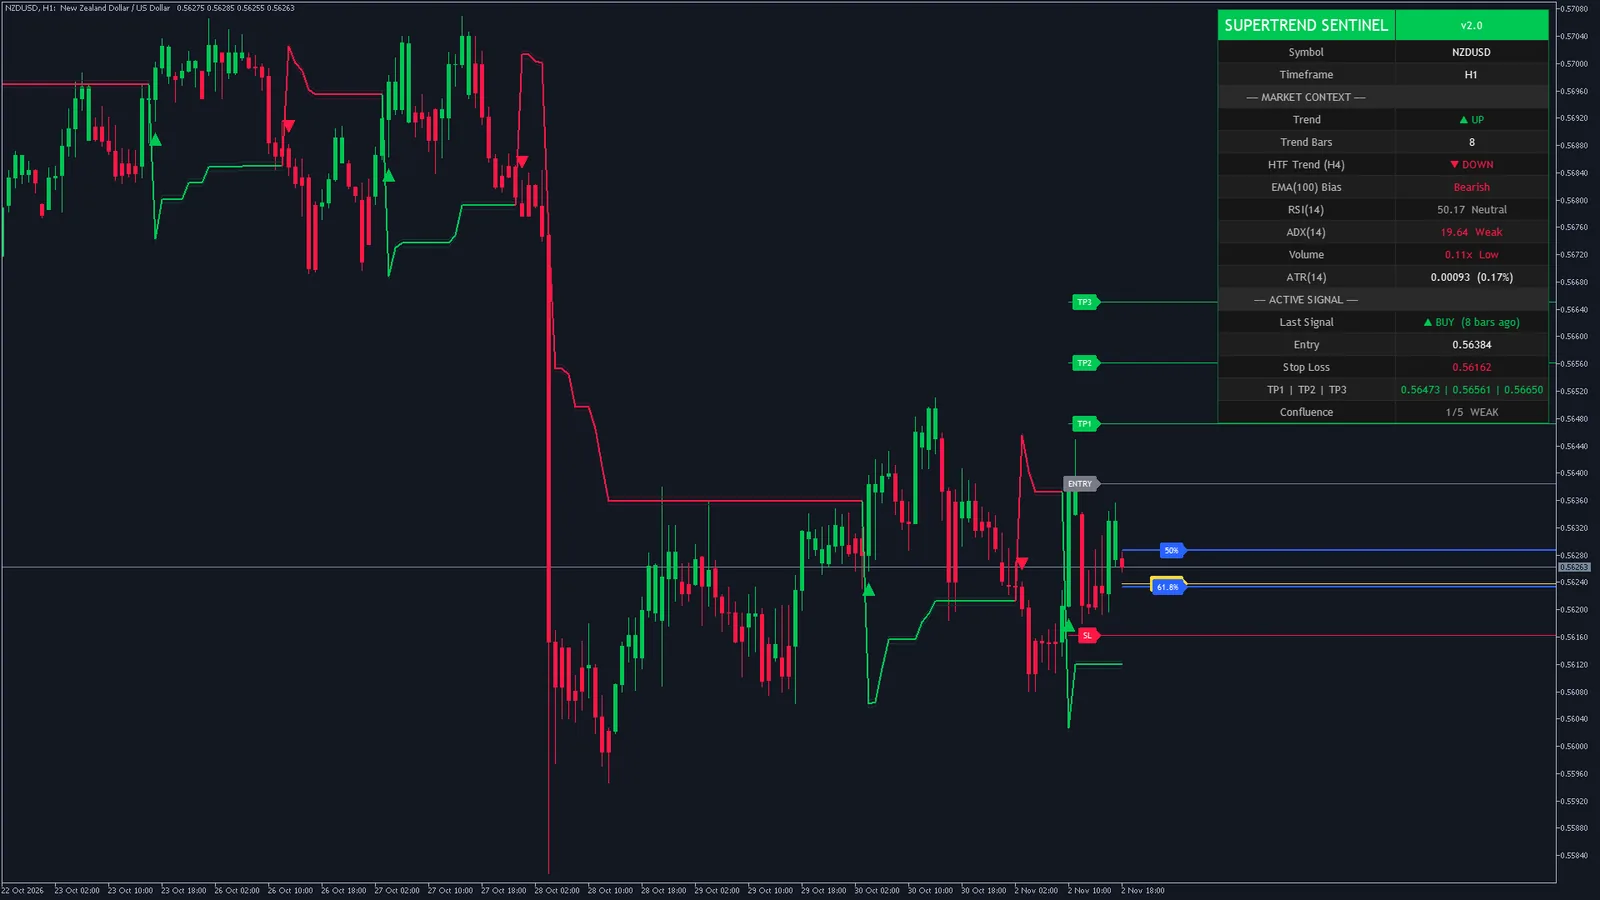
Gold, crypto, oil and indices10 charts
MetaTrader 410 charts
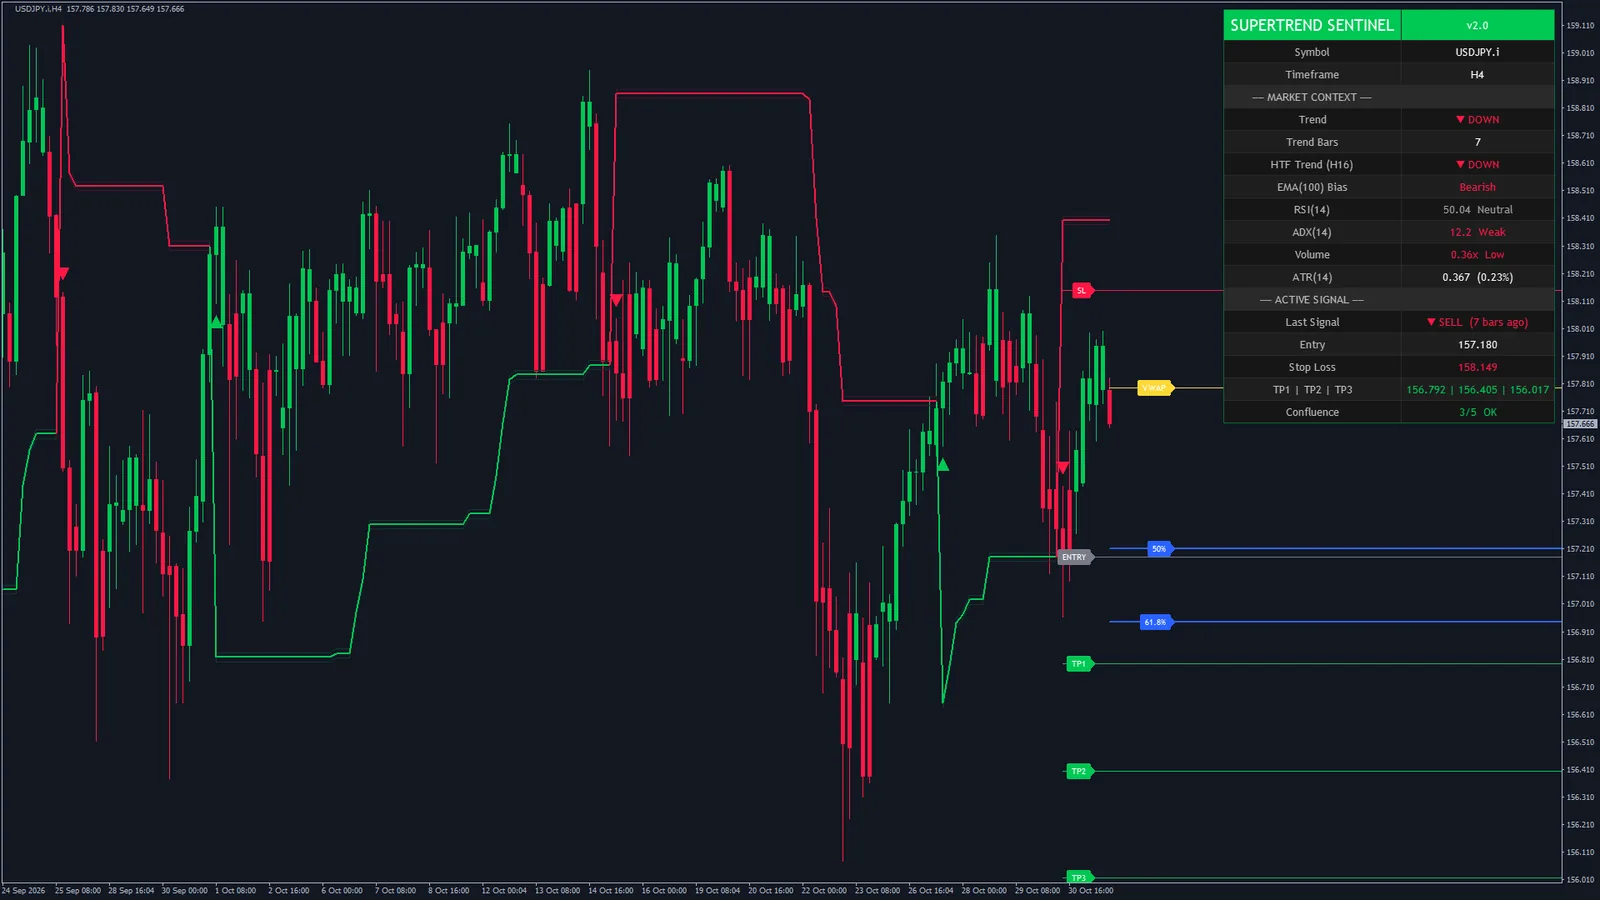
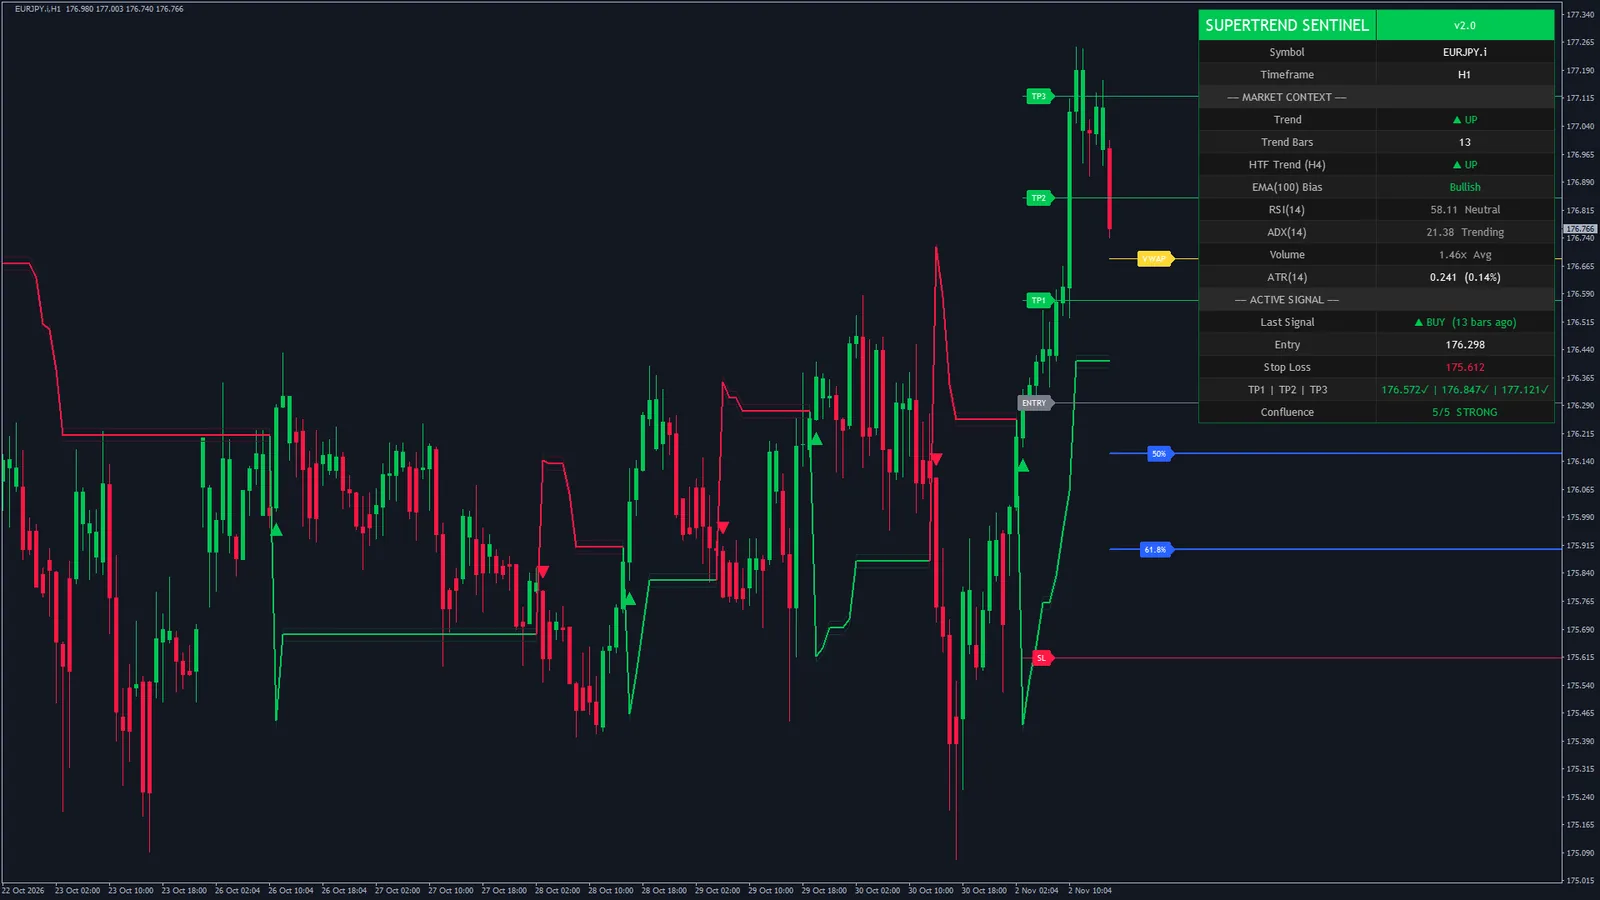
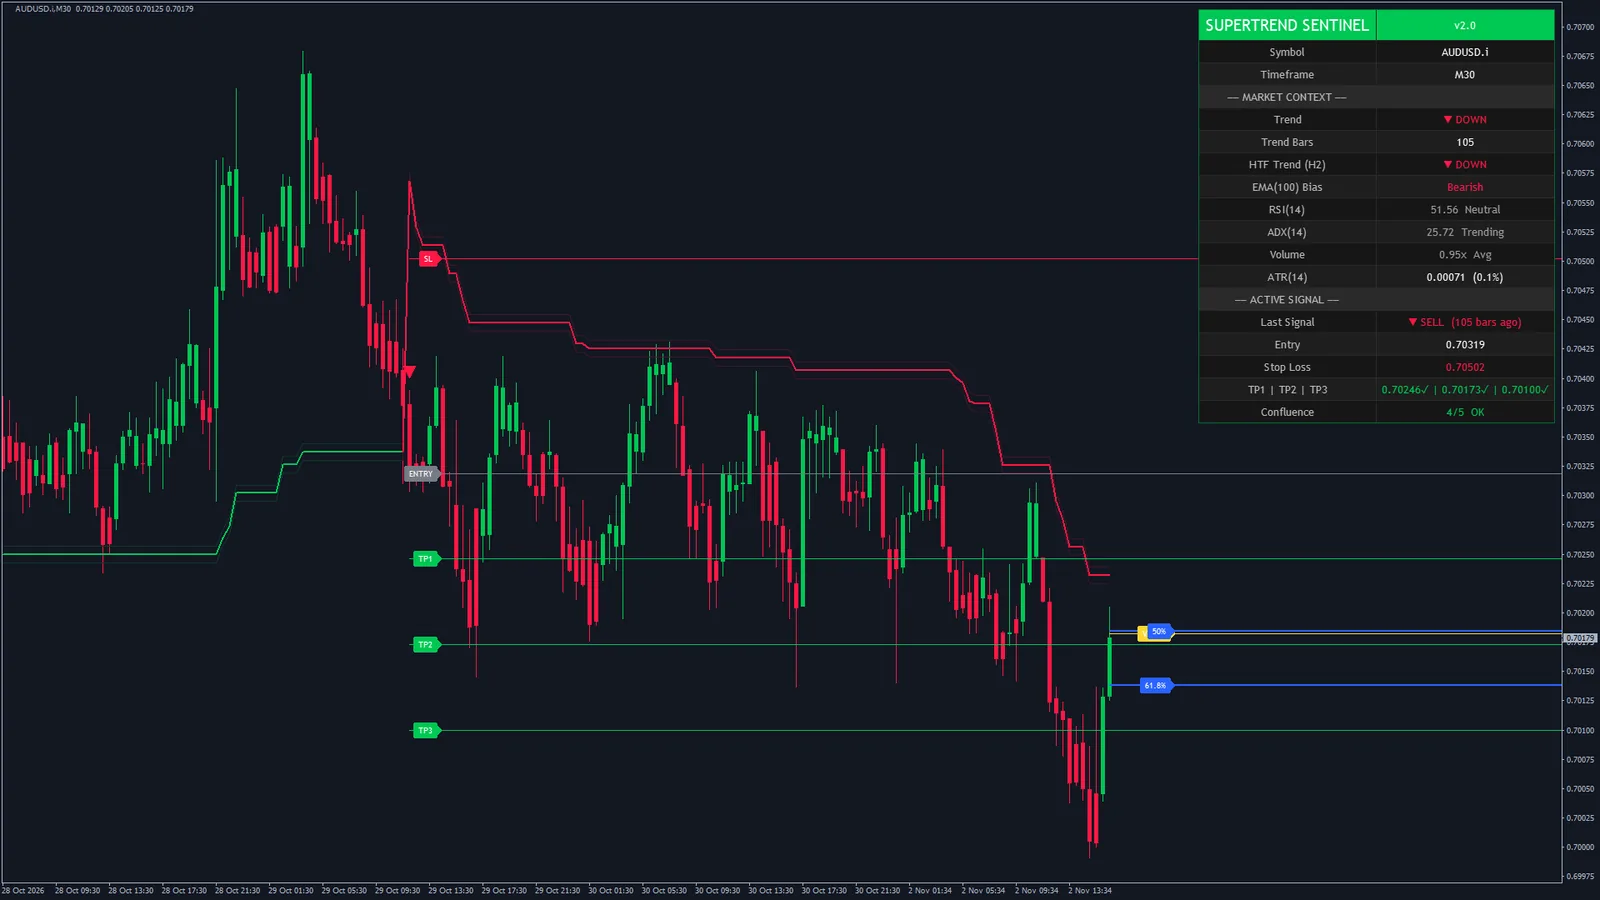
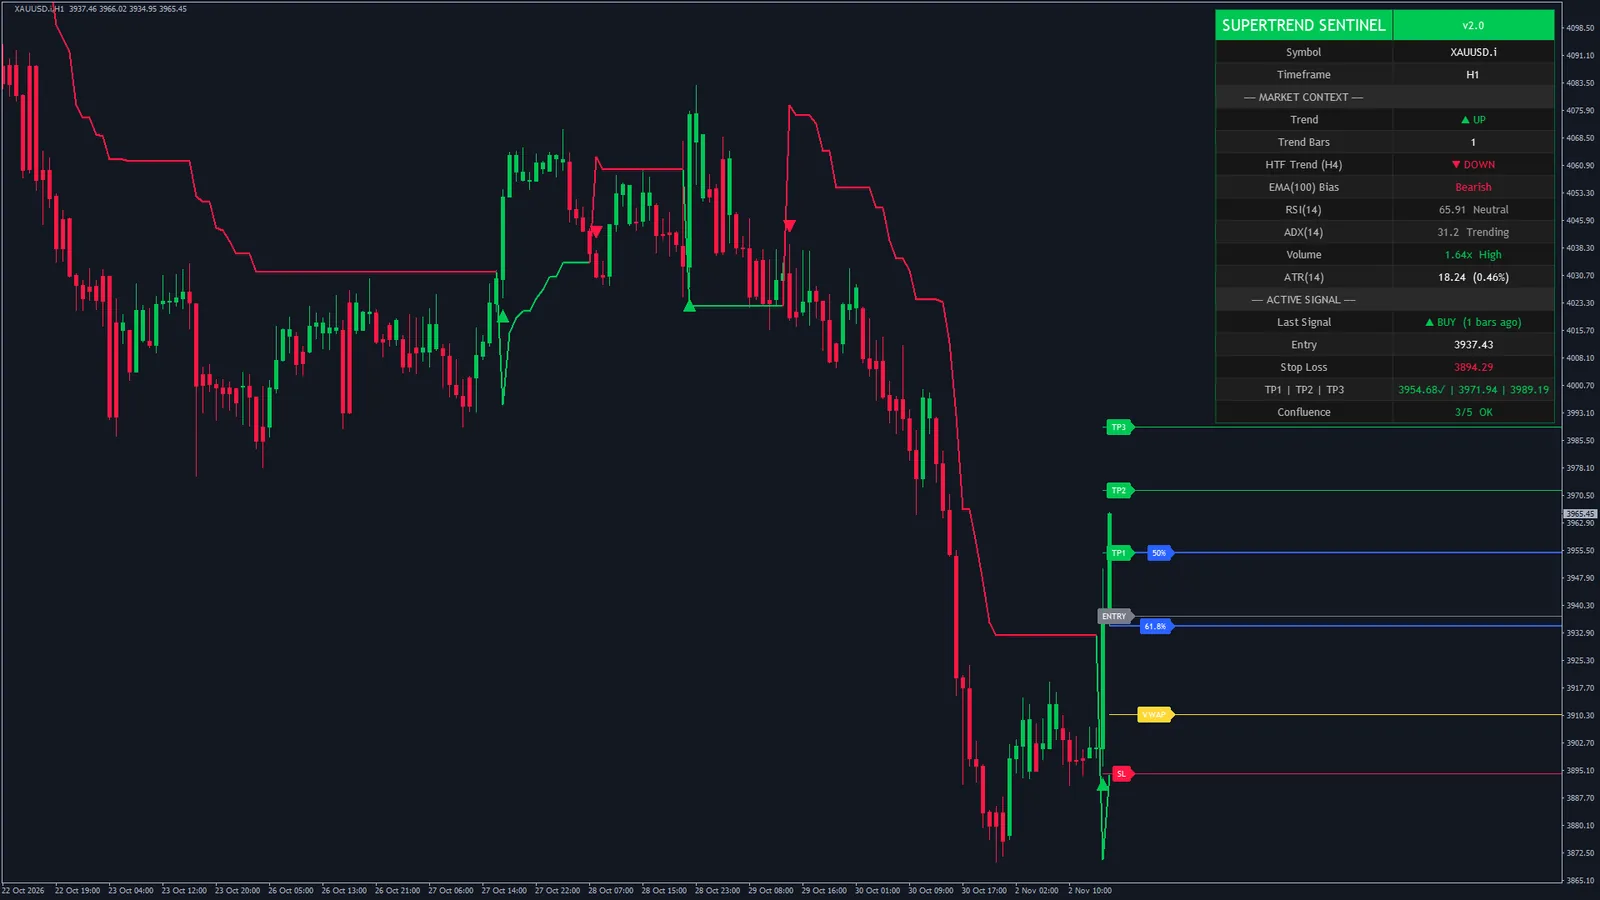
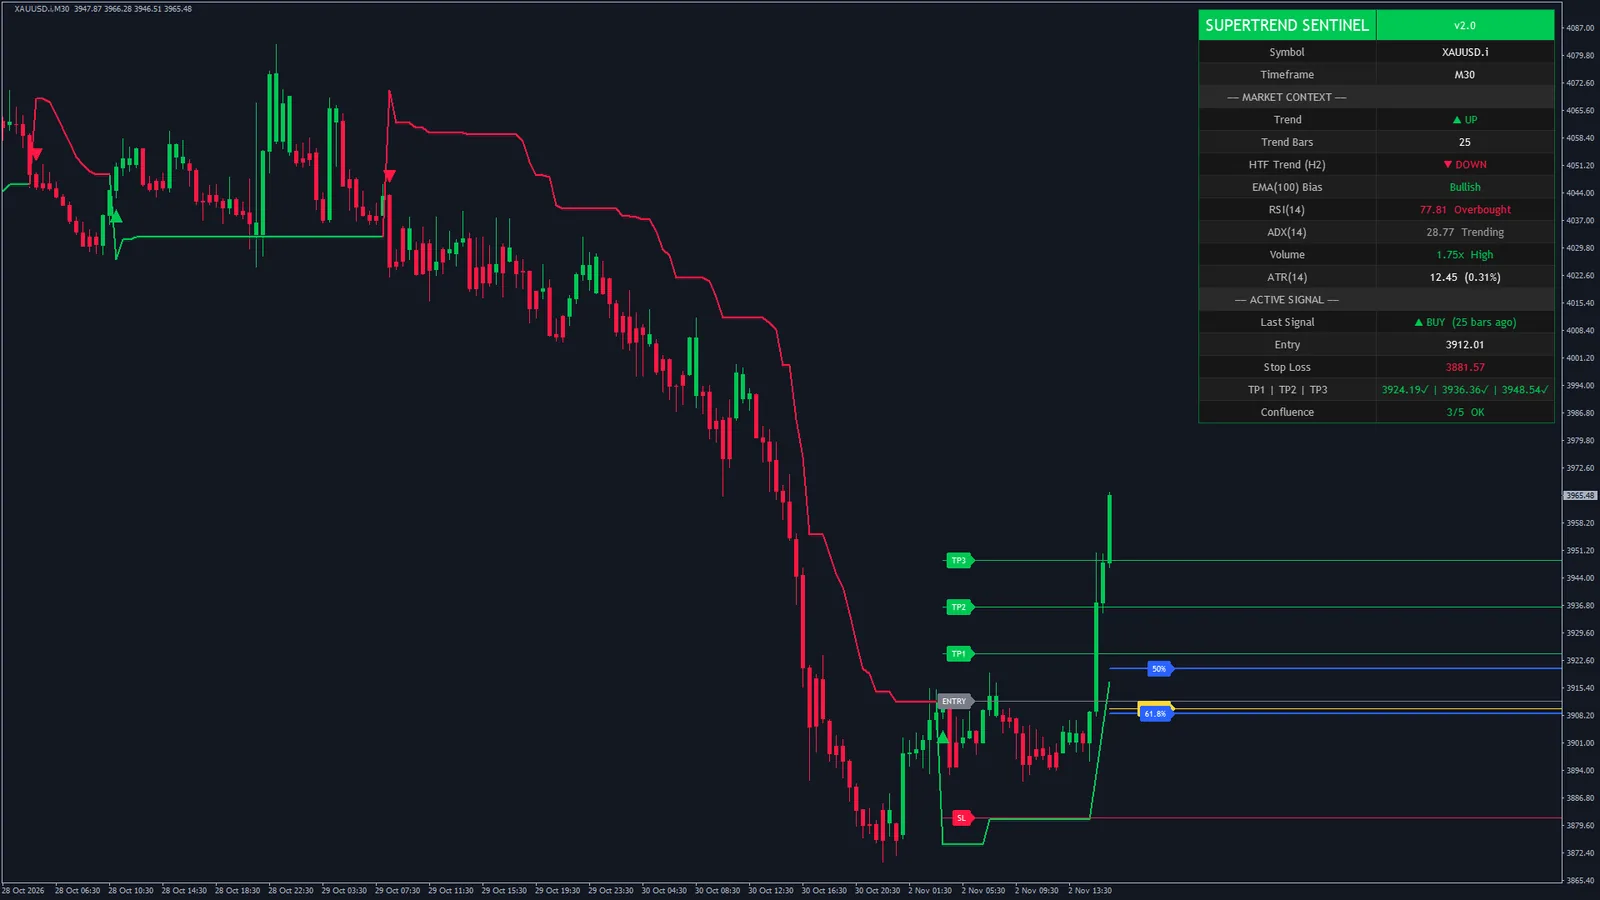
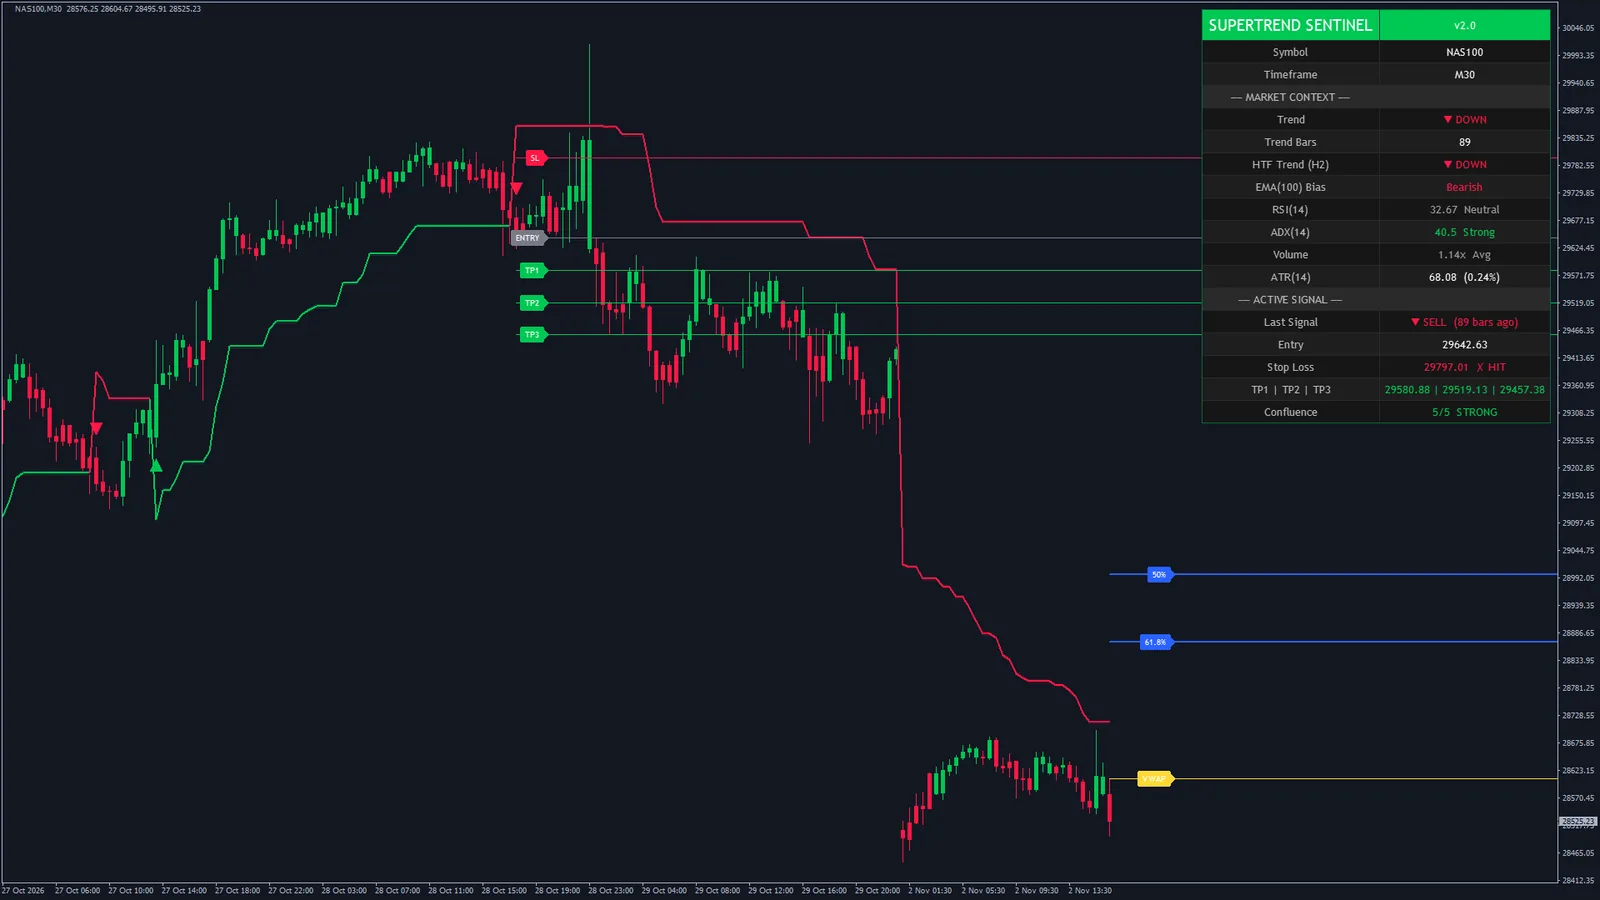
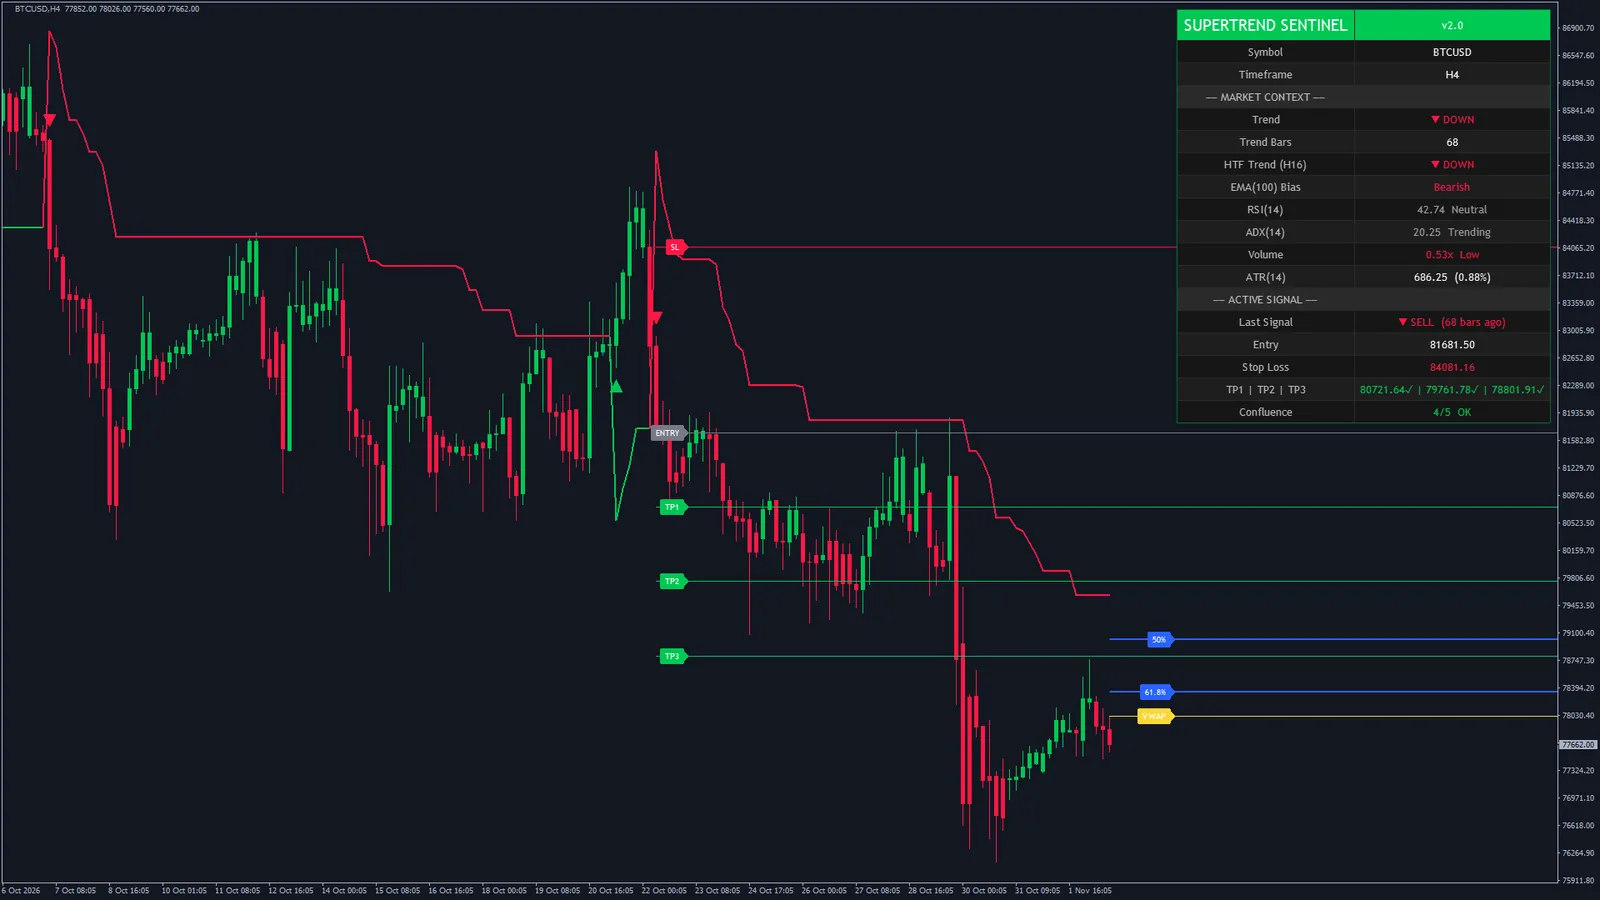
How these charts were captured. So you can repeat them, not just look at them.
- MetaTrader 5 build 6230 on the Eightcap demo server (Eightcap-Demo) and MetaTrader 4 build 1492 on the Blueberry Markets demo server (BlueberryMarkets-Demo), 2 November 2026. The terminals ran unattended: a helper script opened each chart, attached the shipped indicator with its default inputs, waited until the dashboard, the arrows and the plan's lines were drawn and had stopped changing, and saved the chart with MetaTrader's own screenshot function. No chart was edited afterwards.
- Both terminals were connected to their servers, so every chart runs up to the moment of capture; each chart's last bar is in its caption. The indicator calculated the newest 20,000 bars of each chart (all of them where the chart holds fewer), its default Bars to calculate.
- The dashboard values and the newest signal in the captions were computed from each chart's own bars at the moment of capture, by the same engine the indicator runs, and stored next to the screenshot, so every figure traces to a file. On every chart, that engine was checked against the arrows the chart itself drew. Times are the broker's server time. Forex and gold symbols on the MetaTrader 4 server carry a .i suffix.
- Every value the engine computes was compared with the original design's own output, bar by bar, on both builds: 1,306,566 values per platform across 66 charts, no differences in anything the indicator shows or alerts. The arrows, lines, price tags and dashboard text were compared the same way.
A flip, five checks and a plan
Three parts, each one visible on the chart or the dashboard, which is what makes a signal easy to check.
The SuperTrend and its arrows
An ATR(10) SuperTrend at factor 3 flips when the close crosses it, and an arrow prints on the flip when the close also clears a thin buffer zone around the line. Each candle takes its Heikin-Ashi colour, so the bar colour shows the smoothed direction while the prices stay the chart's real ones.
Five checks
The close against the 100 EMA, RSI(14) not already at an extreme, ADX(14) at 20 or more, tick volume at its 20-bar average or above, and the SuperTrend of a timeframe 4 times the chart's, built from the chart's own bars. They never hide an arrow: Filter Mode uses the count to decide which arrows raise an alert.
The plan
The signal bar's close is the entry. The stop sits 2.5 ATR(14) away and the targets at 1, 2 and 3 ATRs. Each is read once, at the signal, and its line stays where it was drawn until the next arrow replaces the plan. Targets are ticked and the stop is marked HIT on the dashboard as price reaches them.
Install the file for your platform
Copy the .ex4 into MQL4/Indicators or the .ex5 into MQL5/Indicators, refresh the Navigator and drag SuperTrend Sentinel Levels onto any chart.
Set how strict
Filter Mode is Balanced by default: 3 of the 5 checks. Loose alerts on every arrow and Strict needs them all. Each check has its own switch, and its levels are inputs.
Read the dashboard
Trend, the higher timeframe, the EMA bias, RSI, ADX, volume, ATR, the newest signal's plan and the live check count, 18 rows in the top right corner.
Let the alerts call you
11 alert events with a switch each: buy, sell, the three targets and the stop are on by default, by popup, sound, push to the MetaTrader app or e-mail.
The market, read for you, and every signal's plan on the chart
A signal you can check is a signal you can judge. The panel reads the trend, the five checks and the newest plan; the lines show where the newest signal is right and where it is wrong, with the day's VWAP and the Fibonacci golden zone beside them.
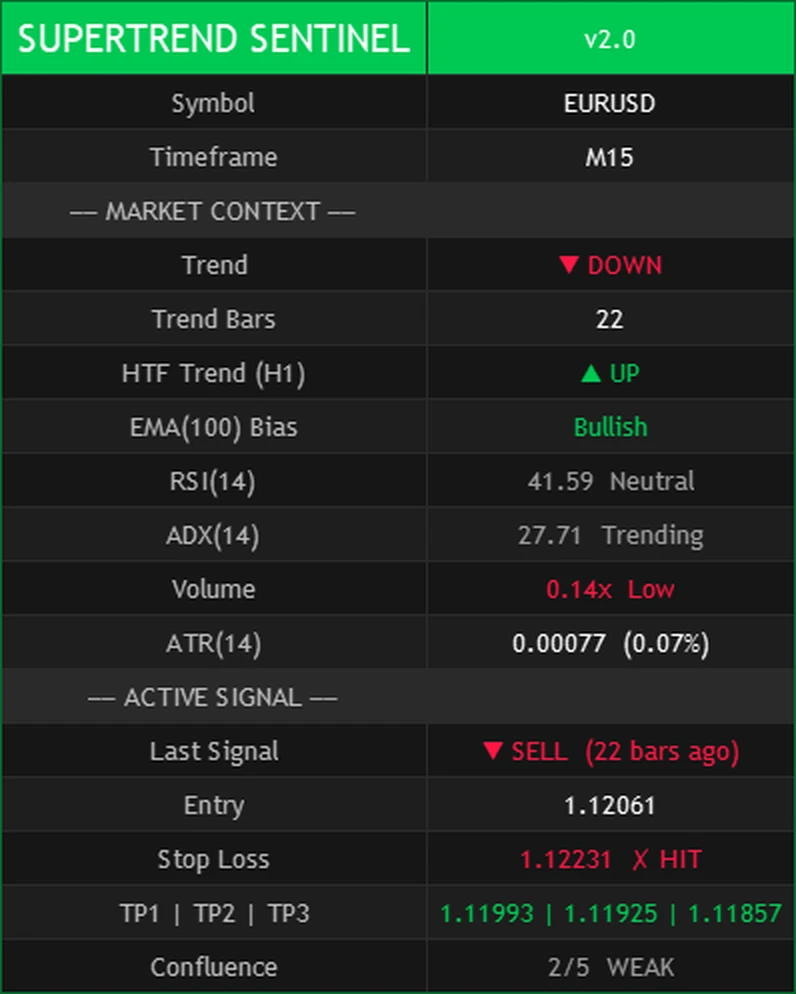
| Row | What it shows |
|---|---|
| SUPERTREND SENTINEL | The header, with the version |
| Symbol | The chart's symbol |
| Timeframe | The chart's timeframe |
| MARKET CONTEXT | Section band |
| Trend | UP or DOWN, the SuperTrend's direction |
| Trend Bars | How many bars ago the SuperTrend last flipped |
| HTF Trend | UP or DOWN, the higher timeframe's SuperTrend on its last closed bar, with that timeframe in the row's name |
| EMA(100) Bias | Bullish above the 100 EMA, Bearish below it, Neutral on it |
| RSI(14) | The value, with Overbought, Oversold or Neutral at your two RSI levels |
| ADX(14) | The value, with Strong from 40, Trending from ADX Min, Weak below it |
| Volume | The bar's tick volume as a multiple of its average, with High from 1.5, Avg from 0.8, Low below it |
| ATR(14) | The ATR in price and as a percentage of the close; it uses ATR Length even if you change it from 14 |
| ACTIVE SIGNAL | Section band |
| Last Signal | BUY or SELL and how many bars ago it printed |
| Entry | The newest signal's close |
| Stop Loss | The newest signal's stop, marked HIT once price has reached it, the signal's own bar included |
| TP1 | TP2 | TP3 | The newest signal's three targets, each ticked once price has reached it |
| Confluence | How many switched-on gates pass right now, on the newest bar, for the current trend: STRONG for all, OK from 3, WEAK from 1, NONE, or DISABLED with no gate on. It is a live reading and moves with the forming bar |
Read the plan as it is. At the defaults the targets sit closer than the stop: TP1 is 0.4 times the stop's distance, TP2 0.8 times and TP3 1.2 times. That is the original design, and all four distances are inputs. A tick and a HIT are readings of the chart, not filled orders: they include the signal's own bar, so a plan can read HIT at once when that bar's range already reached the stop. There is no spread, commission or slippage in them, and the lines stay on the chart until the next arrow replaces them, even after the stop.
Confluence counts the checks right now, on the newest bar, for the current trend, so it can differ from the count the arrow had when it printed. VWAP restarts on the first bar of each server day and uses tick volume, so its value depends on your broker's clock.
The same engine, drawn two ways
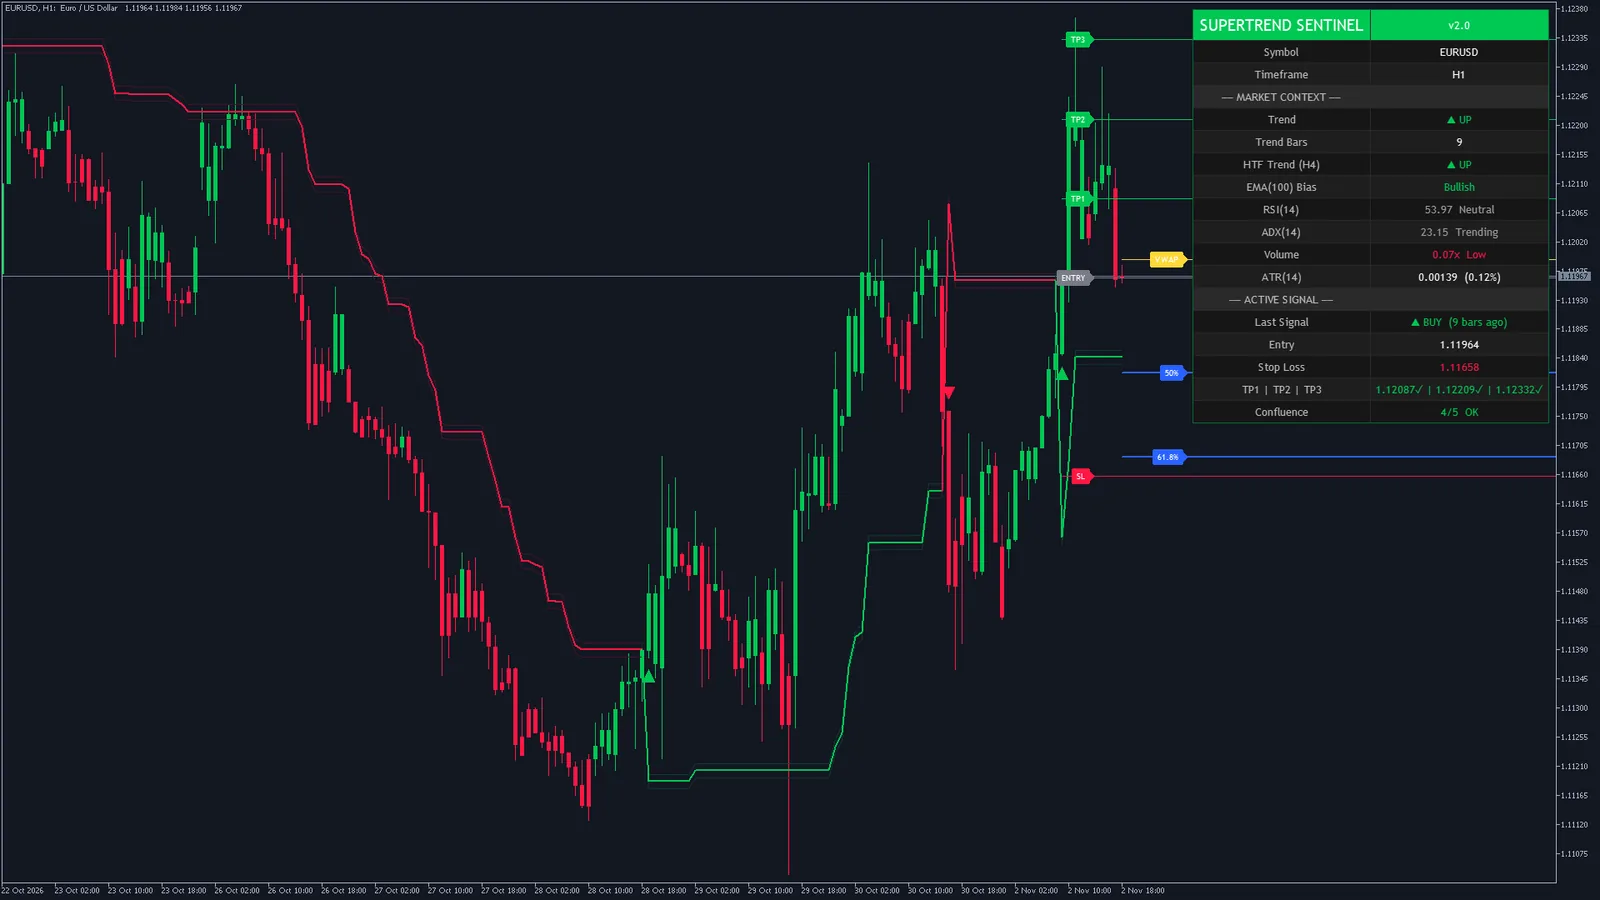
Both builds run the same engine on the same inputs and produce the same arrows, levels, alerts and dashboard values for the same bars; we checked that value by value. The arrows, price tags and the dashboard are drawn the same way on both. What differs is how each platform draws the coloured candles and the lines. MetaTrader also has no see-through lines, so the buffer zone's colour is mixed with your chart background and redrawn if you change the background. Here is EURUSD H1 on both, each from its own broker's feed and running to the moment of capture, so their prices differ slightly.
| MetaTrader 4 | MetaTrader 5 | |
|---|---|---|
| Arrows, levels and alerts | Identical | Identical |
| Dashboard values | Identical | Identical |
| Arrows, price tags and dashboard | Drawn as images, identical | Drawn as images, identical |
| Heikin-Ashi coloured candles | Histogram bars for wick and body, whole candle in the bar colour | Colour candles, whole candle in the bar colour |
| SuperTrend and buffer zone lines | A bull and a bear line each, meeting on the flip bar | One line each, changing colour on the flip bar |
| Higher timeframe | Built from the chart's own bars | Built from the chart's own bars |
| Dashed or dotted target lines | One pixel wide: MetaTrader draws dashes at width 1 only | One pixel wide: MetaTrader draws dashes at width 1 only |
| Alerts | 11 events, popup, sound, push, e-mail | 11 events, popup, sound, push, e-mail |
Three things a SuperTrend should do, done properly
A number on every flip
Instead of treating every flip alike, it counts five checks for each one, shows the count on the dashboard and lets you decide how many an alert needs. You still see every arrow, so you can judge the filter for yourself.
A plan with every signal
The entry, the stop and three targets are drawn when a signal prints, with their tags on the chart, and the dashboard ticks them off as price reaches them. You know where you are wrong before you are in.
Both platforms, one purchase
The .ex4 and the .ex5 come in the same download with a manual for each, so moving between MetaTrader 4 and 5 costs nothing.
SuperTrend Sentinel Levels next to the usual options
Where it wins, and where it does not. A tool that claims to win everywhere is the one to distrust.
| SuperTrend Sentinel Levels | A plain SuperTrend | A moving-average cross | |
|---|---|---|---|
| Signal stays where it printed | With Wait for Bar Close on, the default | On the closed bar, if you wait for it | On the closed bar, if you wait for it |
| Grades each signal | Five checks, counted and shown | No | No |
| Alerts you can filter | Filter Mode, and a switch per check and event | No | No |
| Stop and targets drawn for you | Entry, stop and three targets on every signal | No | No |
| Higher timeframe on the same chart | Built from the chart's own bars | No | No |
| VWAP and Fibonacci levels | On the same chart, each with a switch | No | No |
| Stop at market structure | No. The stop is 2.5 ATRs from the entry, not a swing high or low | You place it | You place it |
| Follows several signals at once | No. One plan at a time: the next arrow replaces it | No | No |
| Sizes and places the trade | No. You choose the size and place the order | No | No |
Honest about who this fits
A good fit if you
- Trade trend flips and want to know what stands behind each one before you act.
- Want the entry, the stop and three targets drawn for you, and alerts only when your checks agree.
- Trade forex, gold, stock indices, oil or crypto on MetaTrader 4 or 5, on anything from M15 to H4.
Not for you if you
- Want an Expert Advisor that places trades for you. This is an indicator: it signals, draws and alerts, and you place the orders.
- Want stops at swing highs and lows, or a stop line that moves with price. This stop is set from ATR at the signal and stays where it was drawn.
- Want fewer arrows on the chart. Every flip gets its arrow; the checks decide the alerts, not the arrows.
- Expect a win rate printed on the box. This page shows what the indicator does, not a promise of profit.
60 inputs, each one explained
The names are the ones you see in the MetaTrader inputs dialog. The defaults are what every chart on this page uses.
| Input | Default | What it does |
|---|---|---|
| SuperTrend Engine | ||
| ATR Period (SuperTrend) | 101 or more | The ATR period of the SuperTrend line. A longer period gives a steadier line and fewer flips. |
| Factor (SuperTrend Multiplier) | 3.00.1 or more | How many ATRs the SuperTrend sits from the middle of the bar. A higher factor gives a wider line and fewer flips. |
| ATR Length (TP/SL distance) | 141 or more | The ATR period behind the stop and the three targets, and behind the ATR row of the dashboard. |
| Buffer Zone % | 0.010 or more | The width of the thin zone on each side of the SuperTrend, as a percentage of its price. An arrow needs the close beyond this zone. |
| TP / SL | ||
| TP1 Factor (x ATR) | 1.00.1 or more | TP1, this many ATRs from the entry. |
| TP2 Factor (x ATR) | 2.00.1 or more | TP2, this many ATRs from the entry. |
| TP3 Factor (x ATR) | 3.00.1 or more | TP3, this many ATRs from the entry. |
| Stop Loss Factor (x ATR) | 2.50.1 or more | The stop, this many ATRs from the entry when Stop Loss Type is Fixed. |
| Stop Loss Type | Fixed | Fixed: the stop is the Stop Loss Factor away from the entry. Trailing: the stop comes from a running extreme of the close and that distance, which often sits much closer than the factor and can even sit on the wrong side of the entry. In both cases the stop is read once, at the signal, and its line never moves. Start with Fixed. |
| Line Style | Solid | How the target and stop lines are drawn. MetaTrader draws dashes and dots at width 1 only. |
| Line Width | 11 or more | The width of the target and stop lines. |
| Show TP1 Line | On | Draws the TP1 line and tag. The target is still tracked with it off. |
| Show TP2 Line | On | Draws the TP2 line and tag. The target is still tracked with it off. |
| Show TP3 Line | On | Draws the TP3 line and tag. The target is still tracked with it off. |
| Show Stop Loss Line | On | Draws the stop line and tag. The stop is still tracked with it off. |
| Label Transparency (0=Opaque, 100=Hidden) | 00 to 100 | How see-through the price tags are: 0 is opaque, 100 is hidden. |
| Label Position | Right | Which side of its price a tag sits on: Right, Left, Above or Below. |
| Signal Quality | ||
| Wait for Bar Close | On | On: an arrow is decided when its bar has closed and stays where it printed. Off: an arrow can appear while the bar is forming and disappear again before it closes, and the alerts follow it. |
| Filter Mode | Balanced (3 of 5) | Decides which arrows raise a Buy or Sell alert. Loose: every arrow. Balanced: at least 3 of the switched-on gates pass (all of them when 3 or fewer are on). Strict: all of them. It never hides an arrow. |
| Gate: EMA(100) Bias | On | Counts a buy when the close is above the 100 EMA and a sell when it is below. |
| Gate: RSI not at extreme | On | Counts a buy when RSI(14) is below RSI Overbought and a sell when it is above RSI Oversold. |
| RSI Overbought | 7051 to 95 | RSI at or above this level fails the RSI gate for a buy and reads Overbought on the dashboard. |
| RSI Oversold | 305 to 49 | RSI at or below this level fails the RSI gate for a sell and reads Oversold on the dashboard. |
| Gate: ADX trending | On | Counts a signal when ADX(14) is at or above ADX Min, in either direction. |
| ADX Min | 2010 to 50 | The ADX level the ADX gate needs, and where the ADX row changes from Weak to Trending. |
| Gate: Volume above average | On | Counts a signal when the bar's tick volume is at or above its average, in either direction. |
| Volume MA Length | 205 or more | How many bars the volume average covers. |
| Gate: HTF SuperTrend agrees | On | Counts a buy when the higher-timeframe SuperTrend is up and a sell when it is down. |
| HTF Multiplier | 42 to 12 | The higher timeframe as a multiple of the chart's own: 4 on H1 is H4. It is built from the chart's bars, so timeframes the platform does not offer work too (H2 on MetaTrader 4, H16). The reading is the last closed higher-timeframe bar. |
| VWAP | ||
| Show VWAP Line | On | Draws the VWAP of the current server day as a line with a tag, from the newest bar to the right. It restarts on the first bar of each server day and uses tick volume. |
| Fibonacci | ||
| Show Fibonacci (Golden Zone) | On | Draws the two Fibonacci levels of the recent range as lines with tags, from the newest bar to the right. |
| Lookback Period | 505 or more | How many bars the recent high and low cover. |
| Fibonacci Level 1 | 0.6180 to 1 | The first level, measured down from the recent high: 0.618 is the high minus 61.8 percent of the range. |
| Fibonacci Level 2 | 0.500 to 1 | The second level, measured the same way. The two defaults mark the golden zone. |
| Fibonacci Line 1 Color | #2962FF | The colour of the first Fibonacci line and tag. |
| Fibonacci Line 2 Color | #2962FF | The colour of the second Fibonacci line and tag. |
| Dashboard | ||
| Show Dashboard | On | Shows the dashboard. |
| Dashboard Position | Top Right | The corner or side the dashboard sits in. |
| Dashboard Text Size | Normal | The dashboard's text size: Tiny, Small, Normal, Large or Huge. The table grows with it. |
| Appearance | ||
| Bull Color | #00C853 | Everything bullish: buy arrows, the SuperTrend while it is up, bullish bars, the target lines and tags, and bullish dashboard readings. |
| Bear Color | #FF1744 | Everything bearish: sell arrows, the SuperTrend while it is down, bearish bars, the stop line and tag, and bearish dashboard readings. |
| Neutral Color | #9E9E9E | Dashboard readings that are neither bullish nor bearish. |
| Color Bars (Heikin-Ashi) | On | Colours each candle by its Heikin-Ashi direction while keeping the chart's real open, high, low and close. A flat Heikin-Ashi candle keeps the chart's own colour. Works on candle charts. |
| MetaTrader | ||
| Bars to calculate | 200000 or more (0 = all) | How many recent bars are calculated, never fewer than the warm-up plus 500. 0 means the whole history. Earlier bars are left empty, which keeps loading fast. |
| Alerts | ||
| Alert: Buy Signal | On | A buy arrow that passes the Filter Mode. |
| Alert: Sell Signal | On | A sell arrow that passes the Filter Mode. |
| Alert: Any Signal | Off | Either of the two above. Off by default so one arrow does not ring twice. |
| Alert: Strong Buy | Off | A buy alert where every switched-on gate passes. Off by default so one arrow does not ring twice. |
| Alert: Strong Sell | Off | A sell alert where every switched-on gate passes. Off by default so one arrow does not ring twice. |
| Alert: Trend Flip Up | Off | The SuperTrend turning up, whatever the gates say. Off by default so one flip does not ring twice. |
| Alert: Trend Flip Down | Off | The SuperTrend turning down, whatever the gates say. Off by default so one flip does not ring twice. |
| Alert: TP1 Hit | On | Price reaching TP1 of the newest signal, once. |
| Alert: TP2 Hit | On | Price reaching TP2 of the newest signal, once. |
| Alert: TP3 Hit | On | Price reaching TP3 of the newest signal, once. |
| Alert: SL Hit | On | Price reaching the stop of the newest signal, once. Tracking of that signal ends here. |
| Pop-up alert | On | MetaTrader's alert window, with its own sound. |
| Sound | Off | Plays the sound file below on each alert. |
| Sound file | alert.wav | A .wav file in the terminal's Sounds folder. |
| Push notification | Off | Push notification to the MetaTrader app on your phone (set up under Tools, Options, Notifications). |
| Off | E-mail through the terminal's own mail settings (Tools, Options, Email). | |
11 alert events, four ways to hear about them
With Wait for Bar Close on, every alert is decided on a closed bar. Each fires once per event for that bar, and never for the history the indicator calculates when it loads or in the Strategy Tester. The messages name the symbol, the timeframe and, for a signal, the close at the symbol's own decimals. For the newest signal on the EURUSD H1 chart above, which passed Balanced with 4 of 5 checks, the messages read:
- SuperTrend Sentinel Levels - BUY on EURUSD (H1) @ 1.11964
- SuperTrend Sentinel Levels - TP1 hit on EURUSD (H1)
- SuperTrend Sentinel Levels - TP2 hit on EURUSD (H1)
- SuperTrend Sentinel Levels - TP3 hit on EURUSD (H1)
Buy and Sell follow Filter Mode. Strong Buy and Strong Sell need every switched-on check to pass. The two trend-flip alerts fire on every flip whatever the checks say. Those four and Any Signal are off by default, so one arrow does not ring several times; switch them on if you want them.
Each event can reach you as a MetaTrader popup, a sound of your choice, a push notification to the MetaTrader app on your phone or an e-mail, with one switch per channel and one switch per event.
- Buy Signal SuperTrend Sentinel Levels - BUY on [symbol] ([timeframe]) @ [close], on by default
- Sell Signal SuperTrend Sentinel Levels - SELL on [symbol] ([timeframe]) @ [close], on by default
- Any Signal SuperTrend Sentinel Levels - Signal on [symbol] ([timeframe]) @ [close], off by default
- Strong Buy SuperTrend Sentinel Levels - STRONG BUY on [symbol] ([timeframe]) @ [close], off by default
- Strong Sell SuperTrend Sentinel Levels - STRONG SELL on [symbol] ([timeframe]) @ [close], off by default
- Trend Flip Up SuperTrend Sentinel Levels - Trend flipped UP on [symbol] ([timeframe]), off by default
- Trend Flip Down SuperTrend Sentinel Levels - Trend flipped DOWN on [symbol] ([timeframe]), off by default
- TP1 Hit SuperTrend Sentinel Levels - TP1 hit on [symbol] ([timeframe]), on by default
- TP2 Hit SuperTrend Sentinel Levels - TP2 hit on [symbol] ([timeframe]), on by default
- TP3 Hit SuperTrend Sentinel Levels - TP3 hit on [symbol] ([timeframe]), on by default
- SL Hit SuperTrend Sentinel Levels - SL hit on [symbol] ([timeframe]), on by default
Two builds, two manuals, nothing left to configure
- 2Indicator builds, version 2.00SuperTrend_Sentinel_Levels.ex4 for MetaTrader 4 and SuperTrend_Sentinel_Levels.ex5 for MetaTrader 5, in one 3.8 MB download.
- 2PDF manualsOne per platform, 27 and 26 pages: install, the arrows, the five checks, the plan, VWAP and Fibonacci, every dashboard row, every input, alerts and troubleshooting.
- 5ChecksEMA(100) Bias, RSI not at extreme, ADX trending, Volume above average, HTF SuperTrend agrees, each with its own switch.
- 60InputsEvery one explained, with the original design's defaults.
- 11Alert eventsBy popup, sound, push or e-mail.
- 60Day money-back guaranteeIf it is not for you, e-mail within 60 days of purchase for a full refund.

Dominic Walsh
Founder, forexobroker.com
I have traded forex since 2014 and started writing about it the same year. forexobroker.com now reaches over 40,000 readers a month, and every indicator, Expert Advisor and tutorial on it is something I have built, tested or used in my own trading.
SuperTrend Sentinel Levels is the SuperTrend I reach for when I want a flip to answer questions before I act on it: what the trend behind it looks like, what the next timeframe up says, and where I am wrong. The charts on this page were captured from the shipped build at its default settings and are shown unedited.
No get-rich claims and no quoted win rates. Every trade is uncertain, and no indicator changes that. If you want to know whether it suits the way you trade before you buy, e-mail me at [email protected] and I will tell you straight.
One price, both platforms
- Both builds: .ex4 for MetaTrader 4 and .ex5 for MetaTrader 5
- Two PDF manuals, one per platform
- Five checks, an entry, a stop and three targets, 60 inputs, 11 alert events
- Instant download and a 60-day money-back guarantee
60-day money-back guarantee. Install it, run it on your own markets and read the manual. If SuperTrend Sentinel Levels is not for you within 60 days of purchase, e-mail [email protected] for a full refund, no questions asked. Files are delivered instantly on a secure download page after checkout. This is a software tool, not financial advice.
Answered straight
The things people actually e-mail about before buying. If yours is not here, ask before you buy at [email protected].
How it works
Does it repaint?
With Wait for Bar Close on, the default, an arrow is decided when its bar closes and stays where it printed, and its alert fires once for that bar. It appears once its bar is complete, which in practice is when the next bar opens. What moves is what is meant to move: the SuperTrend, the bar colour and the dashboard on the bar that is still forming, the VWAP and Fibonacci lines, which are redrawn from the newest bar, and the plan's lines, which always belong to the newest signal. With Wait for Bar Close off, an arrow can appear on a forming bar and disappear again before it closes.
What do the five checks look at?
For a buy: the close above the 100 EMA, RSI(14) below RSI Overbought (70), ADX(14) at or above ADX Min (20), tick volume at or above its 20-bar average, and the higher-timeframe SuperTrend pointing up. A sell mirrors the EMA, the RSI at RSI Oversold (30) and the higher timeframe; ADX and volume read the same either way. Each check has its own switch.
What does Filter Mode change?
Which arrows raise a Buy or Sell alert, and nothing else. Loose alerts on every arrow. Balanced, the default, needs at least 3 of the switched-on checks, or all of them when 3 or fewer are on. Strict needs all of them. Every flip still gets its arrow and its plan, so you can see what the filter let through and what it did not.
What does the Confluence row show?
How many switched-on checks pass right now, on the newest bar, for the current trend: STRONG for all of them, OK from 3, WEAK from 1, NONE for zero. It is a live reading: it moves with the forming bar and can differ from the count the arrow had when it printed, which is the count the alert used.
How are the stop and the targets set?
The signal bar's close is the entry. With Stop Loss Type on Fixed, the stop is 2.5 times ATR(14) away, and the targets 1, 2 and 3 times. All four factors are inputs. At the defaults the targets sit closer than the stop: TP1 is 0.4 times the stop's distance, TP2 0.8 and TP3 1.2. Targets and the stop are checked on the signal's own bar too, targets first, so a plan can read HIT at once when that bar already reached the stop. Tracking ends at the stop, and the next arrow replaces the plan.
What does the Trailing setting of Stop Loss Type do?
It changes how the stop is calculated at the signal, not what the line does afterwards: the value comes from a running extreme of the close and the stop distance, which often sits much closer to the entry than the factor says, and can even sit on the wrong side of it. In both types the stop is read once, at the signal, and its line stays where it was drawn. It is kept because the original design has it; start with Fixed.
What is the higher timeframe here?
The chart's timeframe times HTF Multiplier, 4 by default, so H1 reads H4. It is built from the chart's own bars, which is why timeframes the platform does not offer, such as H2 on MetaTrader 4 or H16, work too, and no other chart has to load. The check and the row read the last closed higher-timeframe bar, so the reading does not change while a higher-timeframe bar forms.
What do the VWAP and Fibonacci lines show?
VWAP is the volume-weighted average price of the current server day, restarted on the day's first bar and calculated from tick volume. The two Fibonacci lines are measured down from the high of the last 50 bars: 61.8 and 50 percent of the range by default, the golden zone. Both are reference levels: neither takes part in the arrows, the checks or the plan.
Why did my candles change colour?
Color Bars paints each candle by its Heikin-Ashi direction, so a bar can close down and still be green while the smoothed direction is up. The open, high, low and close stay the chart's real prices, and the arrows and levels use them. Switch Color Bars off to keep your own candle colours.
The proof
Are the charts on this page real?
Yes. Each one was saved by MetaTrader itself on 2 November 2026, with the shipped indicator attached at its default inputs, and none was edited. Both terminals were connected, so every chart runs to the moment of capture. The values printed next to them were computed from the same charts' bars at the same moment, by the same engine.
Do you publish a win rate?
No, on purpose. Any single number depends on the market, the timeframe, the period, the settings and on how you manage the trade, so it would flatter some charts and hide others. The charts show plans that reached their targets and plans that hit the stop. Test it on a demo account on your own markets before you trade it.
How do I know the MetaTrader version calculates what it should?
Every value the engine computes was compared with the original design's own output, bar by bar, on both builds: 1,306,566 values per platform across 66 charts, with no differences in anything the indicator shows or alerts, and the arrows, lines, tags and dashboard text were compared the same way. At other input settings it was compared with a separate implementation of the same rules. The original design was only recorded at its defaults, so that comparison is the check there.
Does it work on gold, indices and crypto?
Yes. It reads the chart's prices and tick volume, so it runs on any symbol your broker quotes. We captured it across forex, metals, stock indices, oil and crypto, from M15 to H4.
Using it
MetaTrader 4 or 5: which should I use?
Whichever your broker offers; on the same bars the arrows, levels and dashboard values are the same. MetaTrader 5 draws native colour candles; MetaTrader 4 draws them with histogram bars. Both builds are in the download.
Which timeframes work best?
Every chart on this page was taken between M15 and H4, and the indicator reads only the chart it is on, so it behaves the same way on any of them. Higher timeframes give fewer, slower signals and wider stops; lower ones more and tighter. Watch it on a demo chart of the timeframe you trade before you rely on it.
The chart is busy. What can I turn off?
Show VWAP Line, Show Fibonacci and Show Dashboard each have a switch, Show TP1, TP2, TP3 and Show Stop Loss Line remove those lines and tags (they are still tracked on the dashboard and in the alerts), and Color Bars gives you your own candle colours back.
Can I run it on several charts?
Yes. Each chart runs its own copy with its own dashboard, levels and alerts, and every alert names its symbol and timeframe. Two copies on the same chart, with different settings, keep their drawings apart.
Will it trade for me?
No. It is an indicator, not an Expert Advisor: it prints the arrows, draws the levels, shows the dashboard and raises the alerts. You place and manage the orders, with whatever position size and risk your account allows.
After you buy
How do I get it after paying?
Checkout takes you straight to a private download page with one zip holding both builds and both manuals. Bookmark that page for re-downloads.
Do I get updates?
Yes. Free updates to the current version are posted on the same download page.
Do I get the source code?
No. The download holds the compiled .ex4 and .ex5 files and the two manuals.
What is the refund policy?
A 60-day money-back guarantee. If SuperTrend Sentinel Levels is not for you within 60 days of purchase, e-mail [email protected] for a full refund, no questions asked.
See every flip, know what stands behind it, and know where you are wrong before you are in.
Both builds, two manuals and every input explained. Instant download for $47 at the launch price.
Get instant access